Card test simulator
Understanding the PayControl card test simulator and how to use it
As an option on the PayControl UI, the Card Test Simulator is a core tool developed to simulate real-world transaction flows from networks and switches to Banking.Live components or applications. It is used to replicate any kind of authorization message. In addition, it updates the summary of transactions, which allows you to monitor transaction timings and the validity of responses.
The simulator retrieves the ISO-8583 message from the database, and passes it to PayRoute, which processes it as requested. After processing the message, PayRoute returns the response to the simulator, which then uploads the response along with timing data, back to the database.
Using the simulator, you can test mock transaction flows to see how cards, accounts and products may operate in the real world (production).
Configuration options
You can choose and select from multiple configuration points within the simulator allowing for unique and specific transaction testing. The configuration points include:
Transaction message flows
The Card Test Simulator allows users to perform authorisation-type transaction message tests with the option of following these with reversals, reversal advisements, another type of advisement and/or settlement as seen in the diagram and table below.
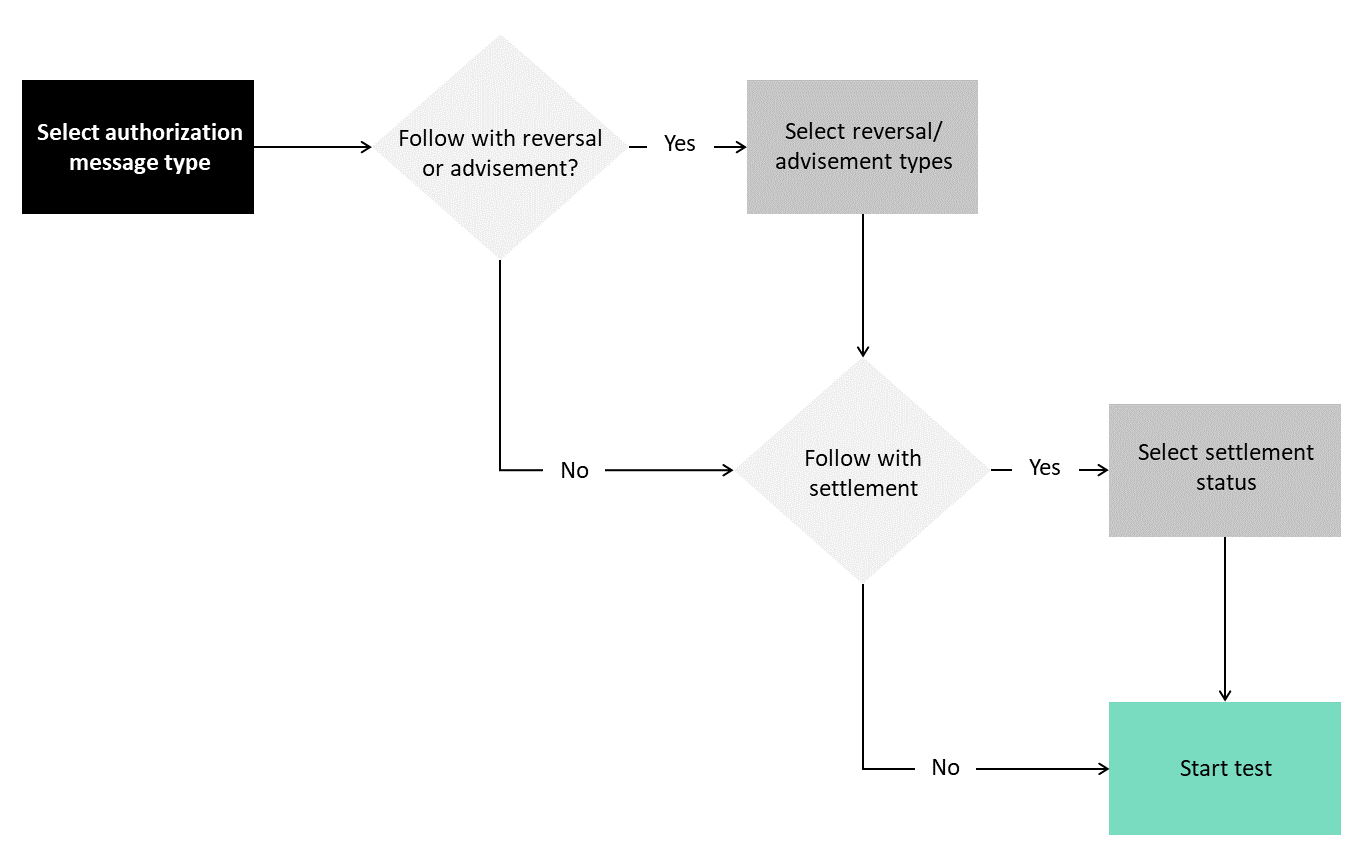
| Follow authorisation with | Types | Additional selection options |
|---|---|---|
| Reversal | Partial reversal | Choose partial reversal amount |
| Full reversal | ||
| Reversal advisement | Reason code | APS error; unable to deliver response |
| APS error; no APS authorisation acknowledgement 0180 or financial transaction acknowledgement 0280 | ||
| Issuer time-out | ||
| Issuer sign-out | ||
| Issuer response error | ||
| Issuer response error | ||
| Reversal message provided by a system other than banknet | ||
| Issuer undelivered | ||
| Detail code | Accept | |
| Reject - negative file | ||
| Reject - capture card | ||
| Reject - issuer not participating | ||
| Reject - invalid PIN | ||
| Reject - ATM | ||
| Reject - transaction limit test | ||
| Reject - premium listing cumulative limit test | ||
| Reject - merchant suspicious indicator test | ||
| Reject - invalid time validation | ||
| Reject - extended cash advance cumulative total | ||
| Other advisement | Reason code | Alternate issuer route - issuer selected option |
| Alternate issuer route - IPS signed out | ||
| Alternate issuer route - IPS timed out | ||
| Alternate issuer route - IPS unavailable | ||
| Transaction processed via x-code | ||
| PIN processing error | ||
| Alternate issuer route - MIP error | ||
| Alternate issuer route - issuer edit response error | ||
| Alternate issuer route - issuer host system error | ||
| Alternate route - network not dispatched error | ||
| Alternate route - issuer undelivered | ||
| Alternate route - direct down option | ||
| Transaction processed via on-behalf service decision | ||
| Invalid merchant | ||
| Transaction blocking | ||
| Account lookup service | ||
| Pay with rewards processing advice to issuer | ||
| Unable to convert contactless or virtual account number | ||
| Mastercard Digital Enablement Service (MDES) advice to issuer | ||
| In control processing advice to issuer (Masterpass QR) | ||
| Authentication advice to issuer | ||
| CAT risk level 3 | ||
| Acquirer Processing System (APS) approved | ||
| Acquirer Processing System (APS) completed authorisation transaction | ||
| M/chip offline advice to issuer | ||
| In control processing advice to issuer | ||
| Administrative textual message transmittal | ||
| Detail code | Accept | |
| Reject - negative file | ||
| Reject - capture card | ||
| Reject - issuer not participating | ||
| Reject - invalid PIN | ||
| Reject - ATM | ||
| Reject - transaction limit test | ||
| Reject - premium listing cumulative limit test | ||
| Reject - merchant suspicious indicator test | ||
| Reject - invalid time validation | ||
| Reject - extended cash advance cumulative total | ||
| Detail text | ||
| Advice amount | Choose input amount | |
| Settlement | Settlement status | Do not generate |
| Generate only if approved | ||
| Always generate |
Test classification
There are three types of test classification users can choose from. The tests are classified as:
| Classification | Description |
|---|---|
| Single spend | Performs a single transaction simulation and reversal or settlement and advisement can also be generated for the transaction once it's complete. |
| Volume spend | Performs a specified count of transaction simulations within a specified time period. A count of transactions is added to the queue to be simulated within the specified time period. |
| Soak test | Performs transaction simulations continuously at a specified rate for a specified time period. Transactions are added to the queue like in the volume test. However, in place of transaction count, you are specifying Transaction Per Second (TPS) to test continuous load. |
Networks and switches
Multiple networks and switch messages are available to simulate and test. Currently, the networks and switches available for simulation testing are:
- AFS
- Mastercard
- PROSA
- Visa
- Mada
- Jetco
- UAESwitch
- Cortex
Spend types
A multitude of spend types and validation methods are available to simulate and test. You can view the full comprehensive list of these on the Card Test Simulator.
Using the simulator
The following sections provide users with a 'how to' guide to using the simulator.
Add your card to the simulator
Prior to commencing card tests, your test card needs to be added to the card test simulator. If this has not been completed already, follow the steps below:
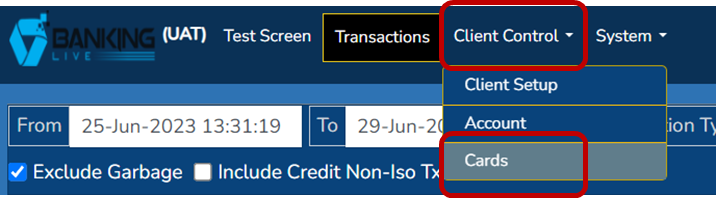
- Head to the cards screen within PayControl
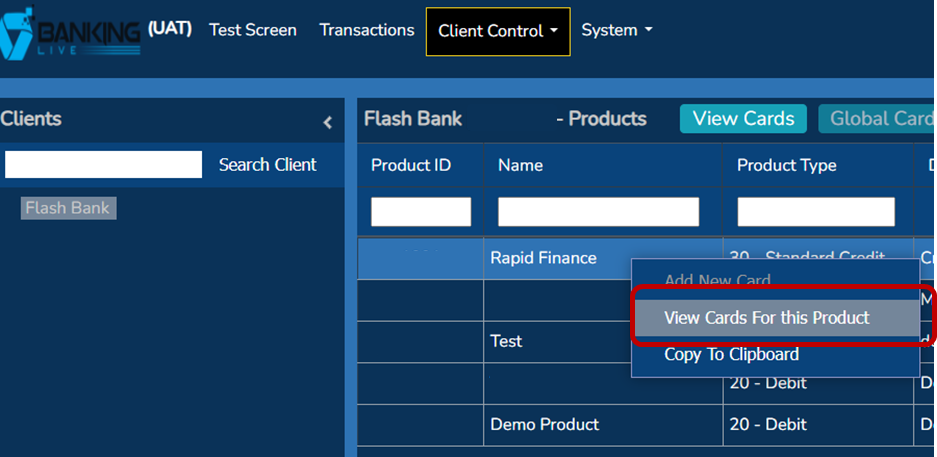
- Right-click on the product you wish to test and select View Cards for this Product
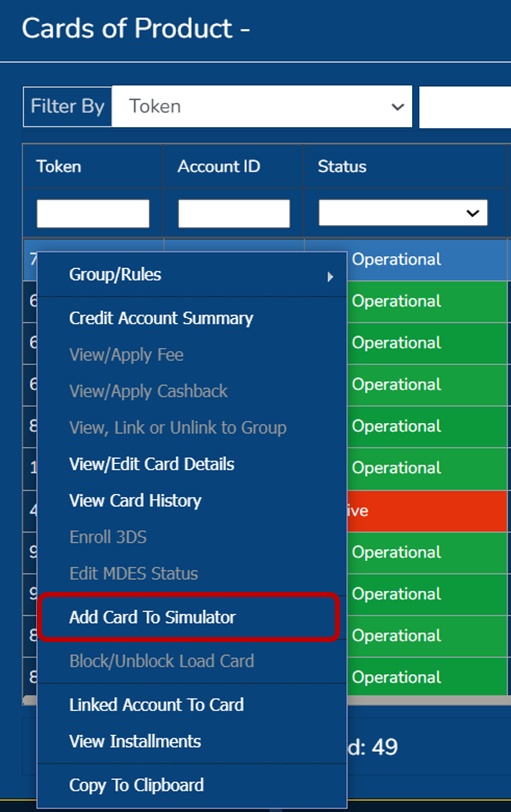
- On the next screen, right-click on the card you wish to add to the simulator and select** Add Card to Simulator**
- Enter the name you wish to give your test card and select Save
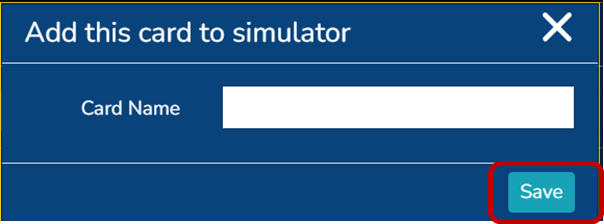
- Upon successful application of the card to the card test simulator, the success message will appear to the right of the screen. You are almost ready to start performing transaction simulations.

Set a PIN for your test card
Prior to performing any tests on your newly created test card, you need to set the PIN on the card. If you skip this step the transaction tests you perform will end in a decline with reason code 55 - invalid PIN.

We set the PIN on the test card by doing the following steps:
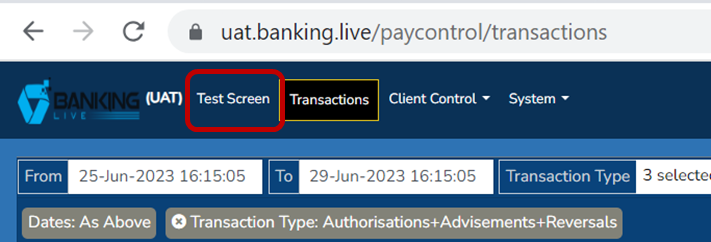
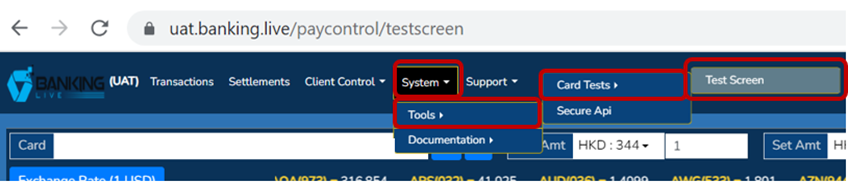
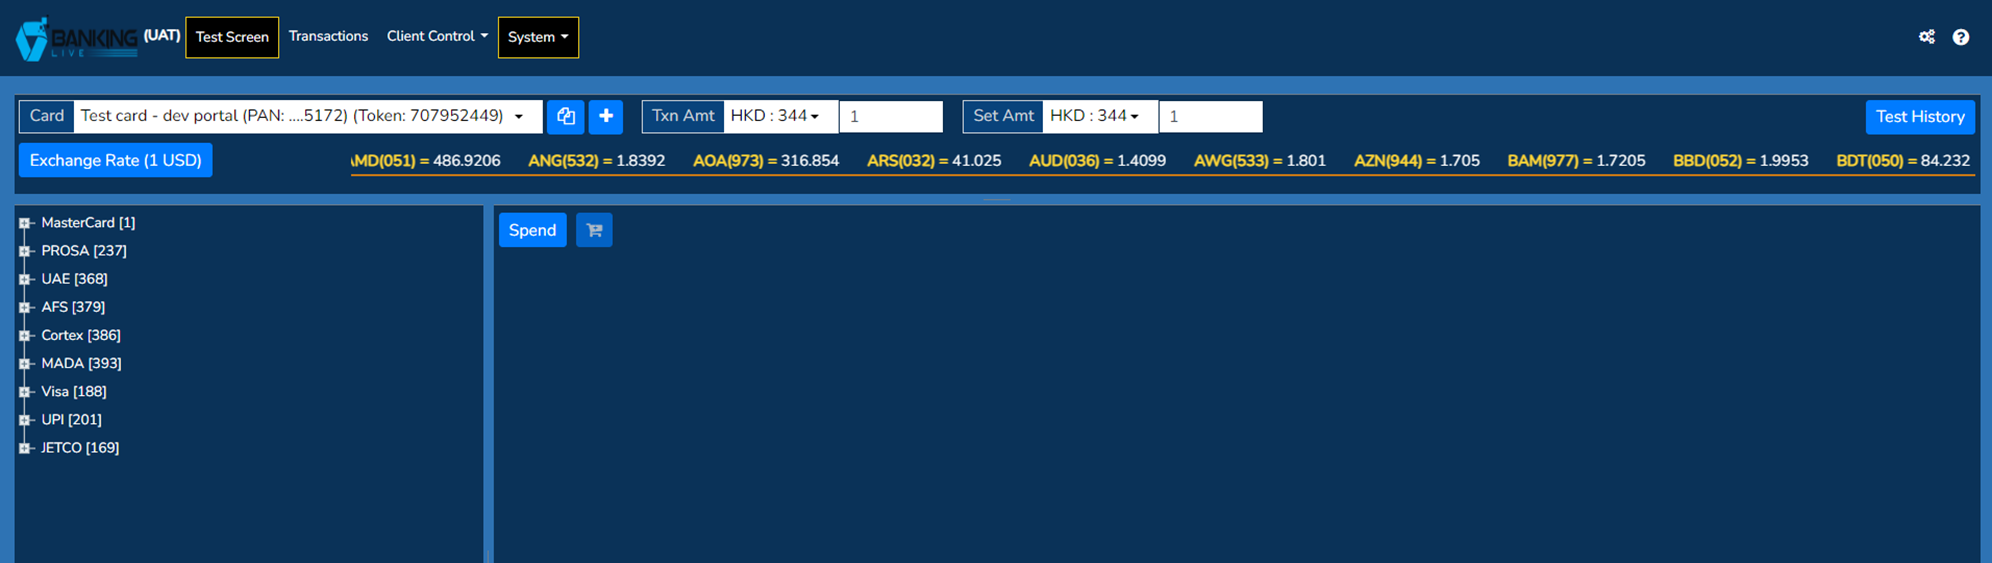
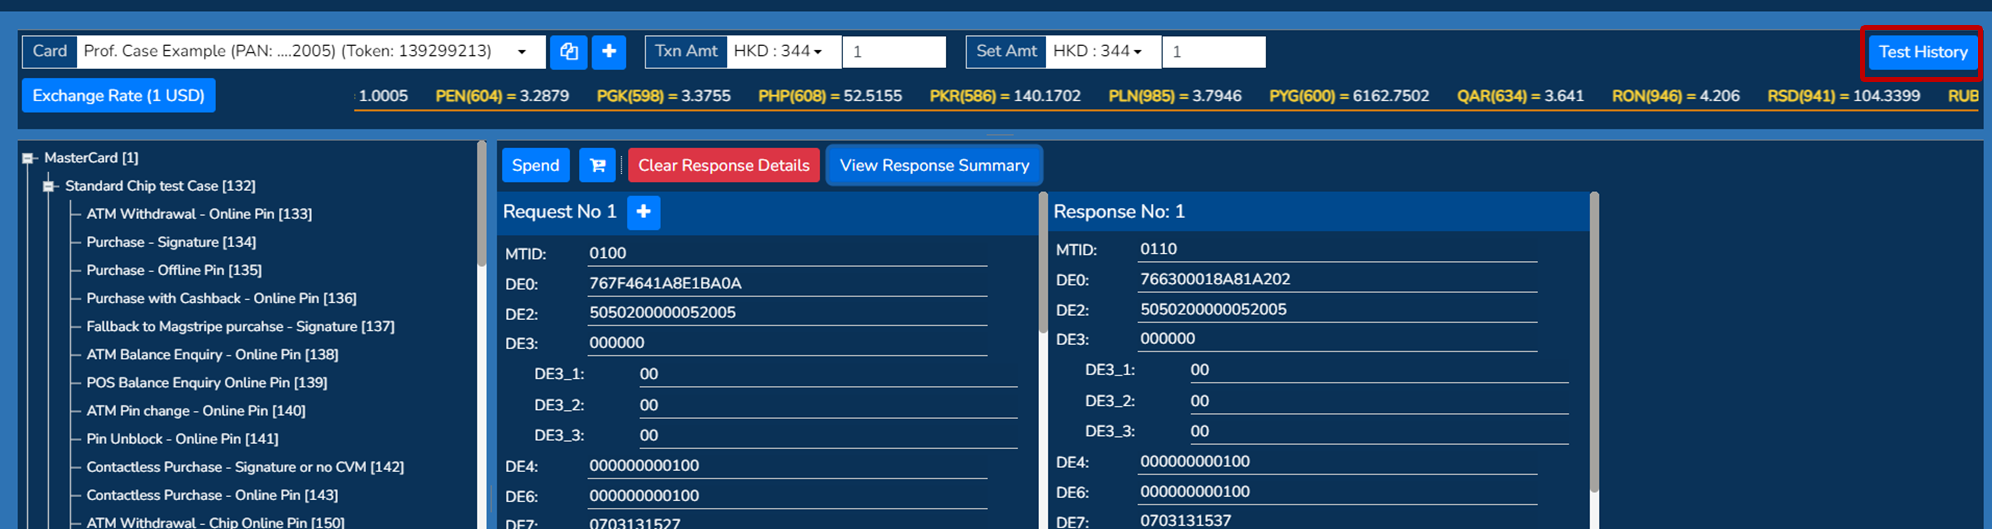
- Proceed to the Test Screen in PayControl. You can navigate to this screen by following the screenshots below, the navigation to the screen will differ based on your access level setup.
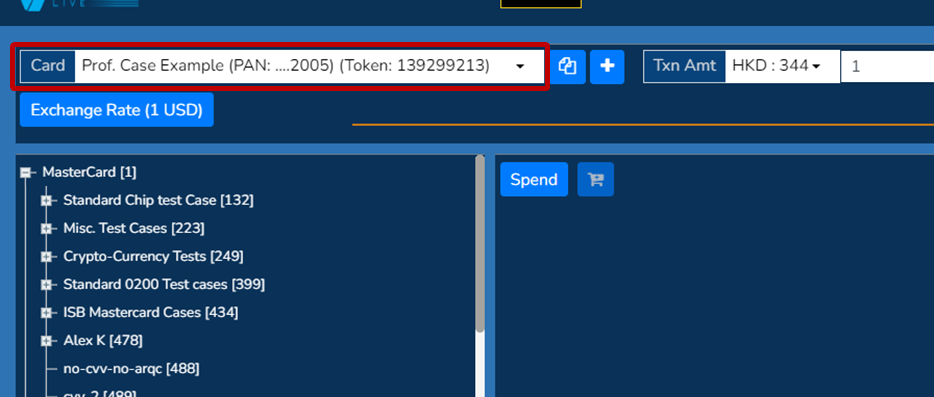
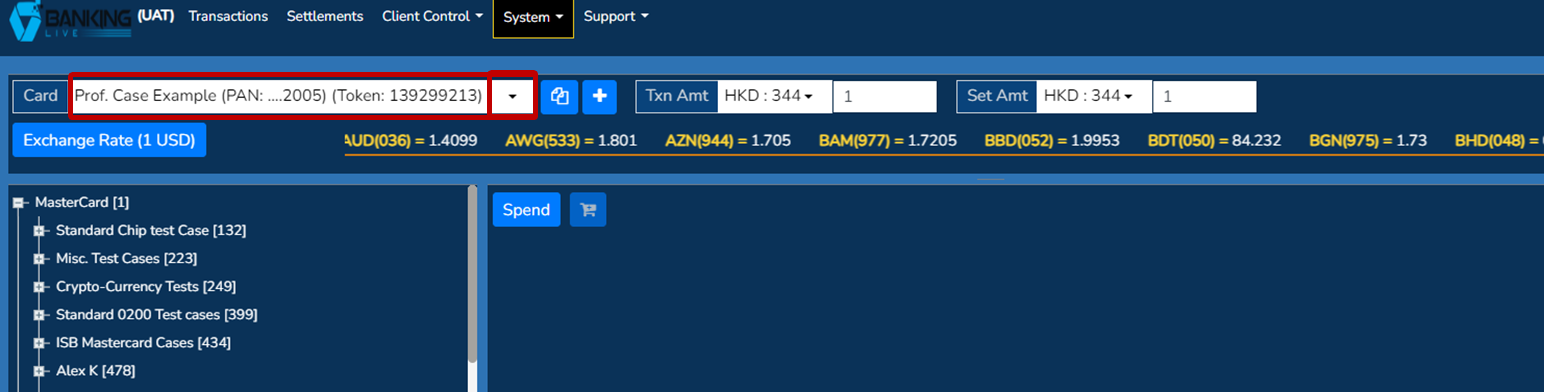
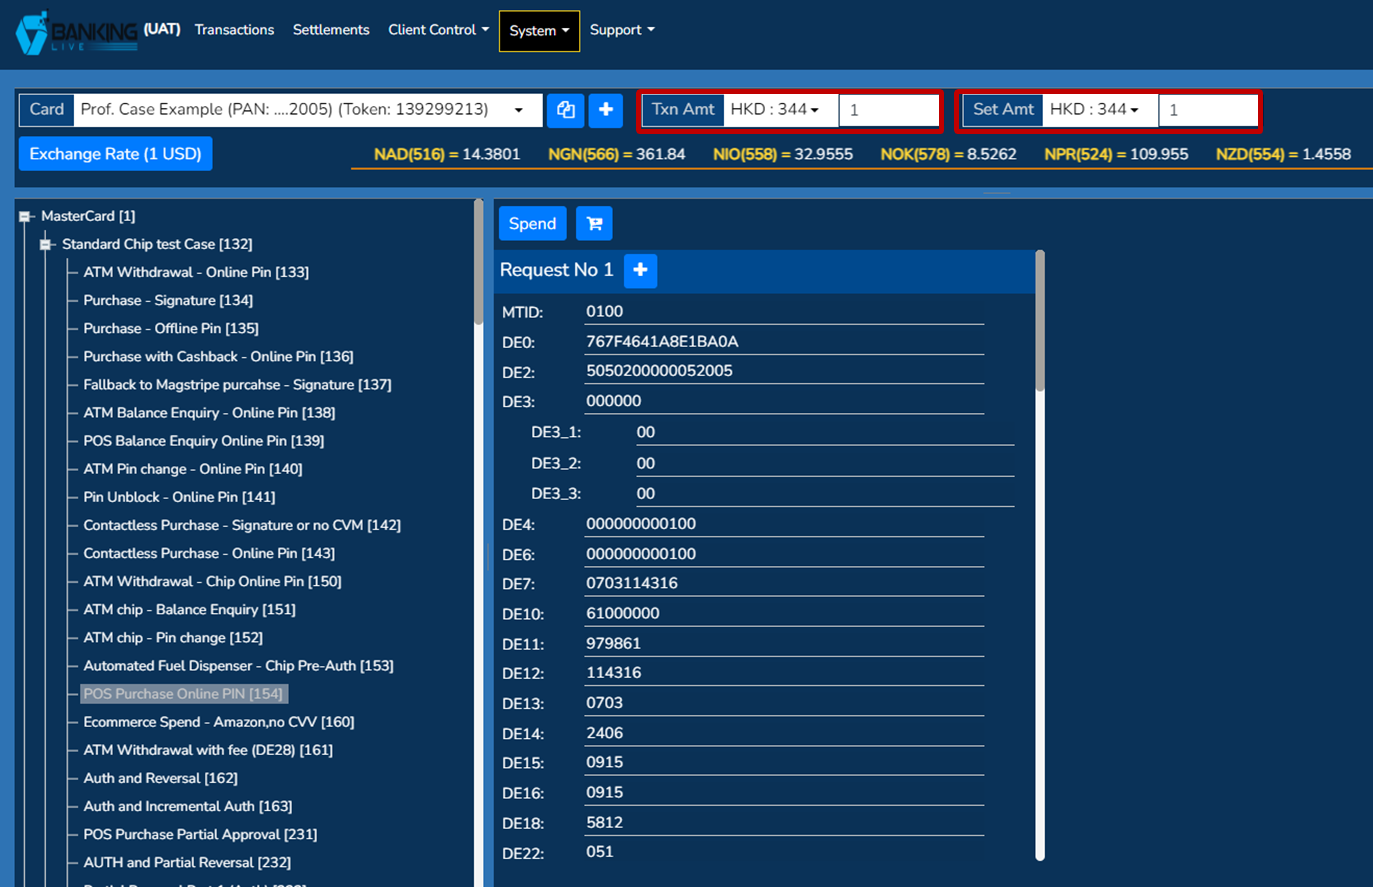
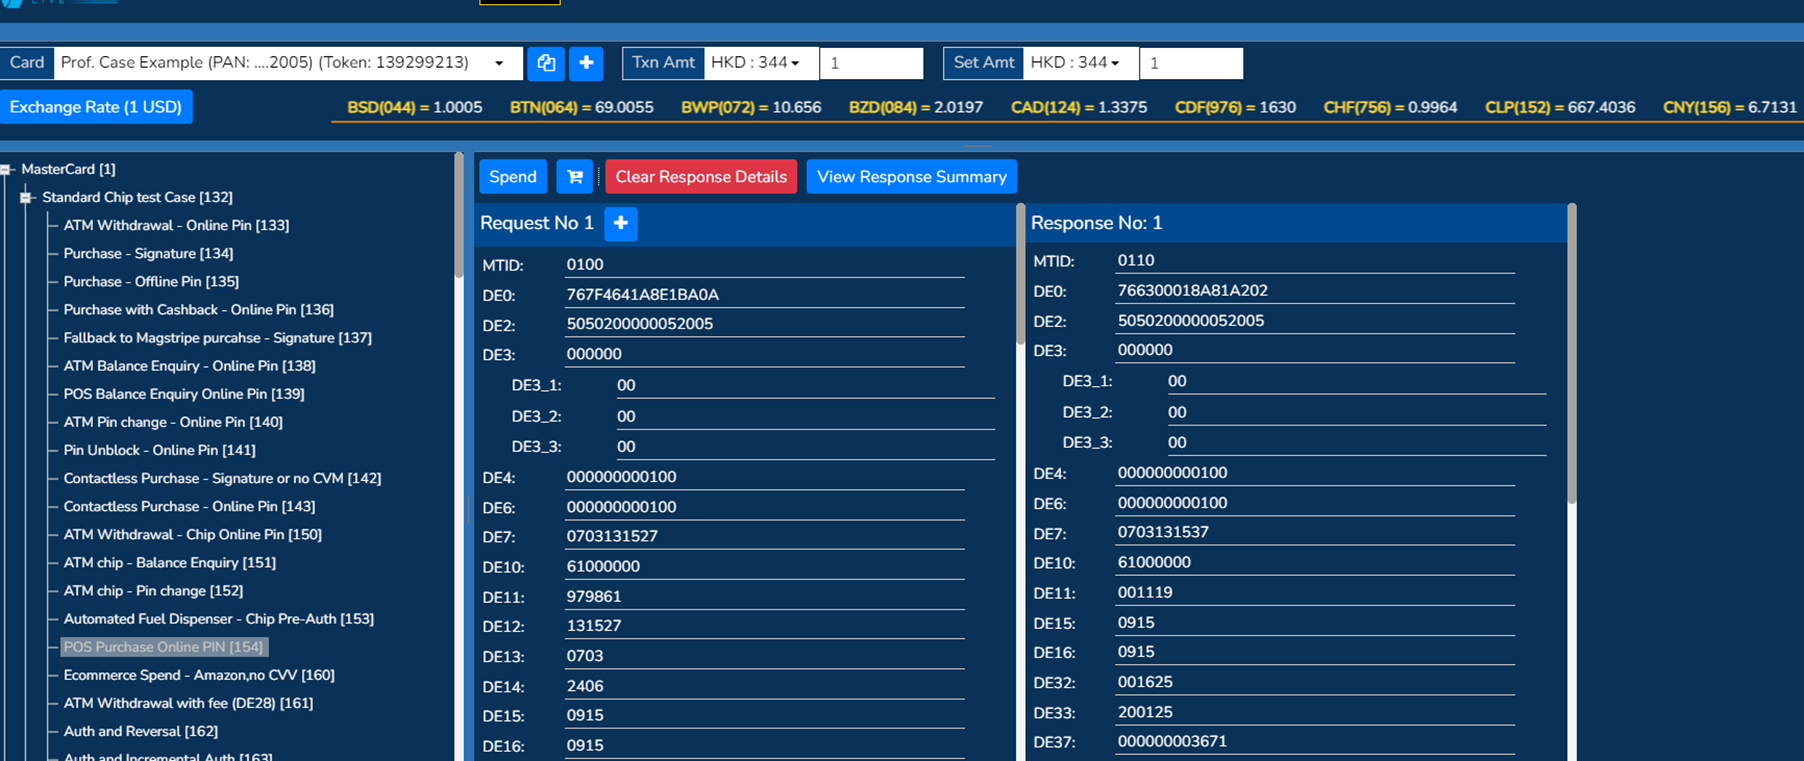
- Test cards must be selected from the top left-hand corner drop-down menu. Example: card called Prof . Case Example is selected.
- Copy the test card details to clip board by selecting the corner fold page button.
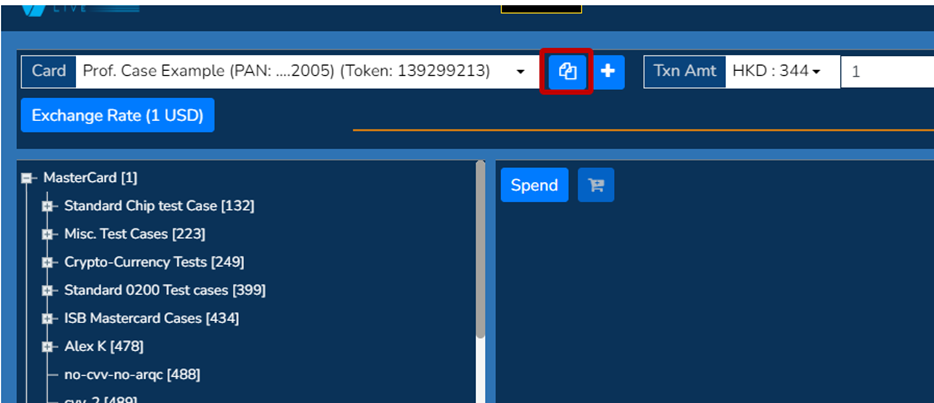
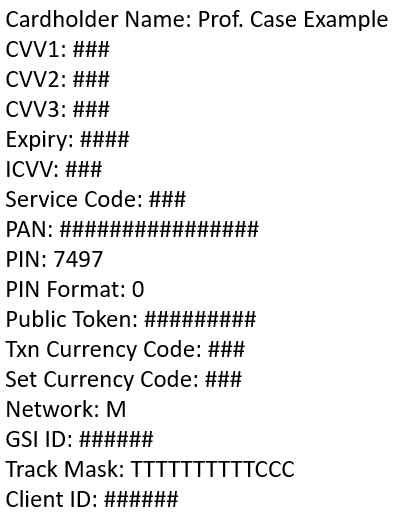
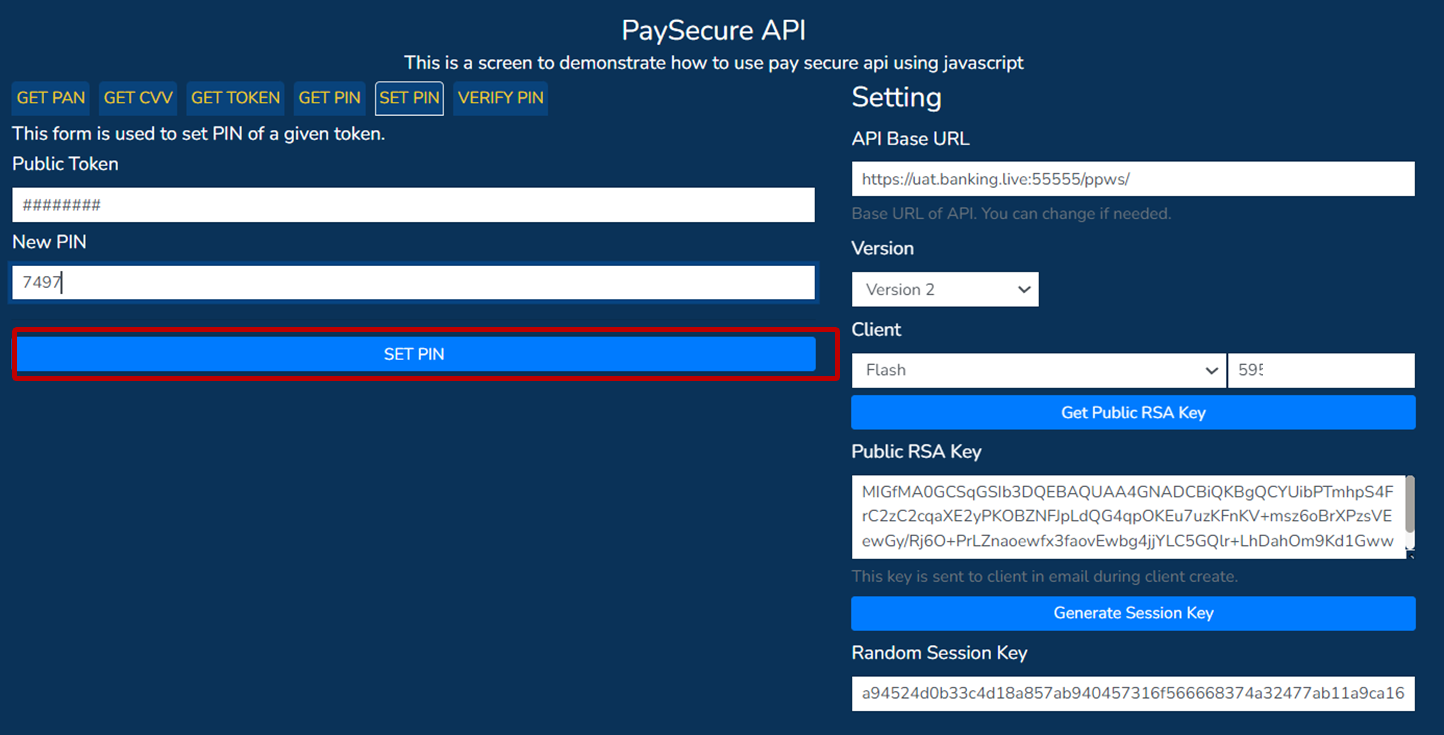
- Paste and save these card details somewhere. They will resemble the below. The specific information you will be needing for the next steps is the PIN and Public Token._ Example: PIN 7497 and Public Token ########_
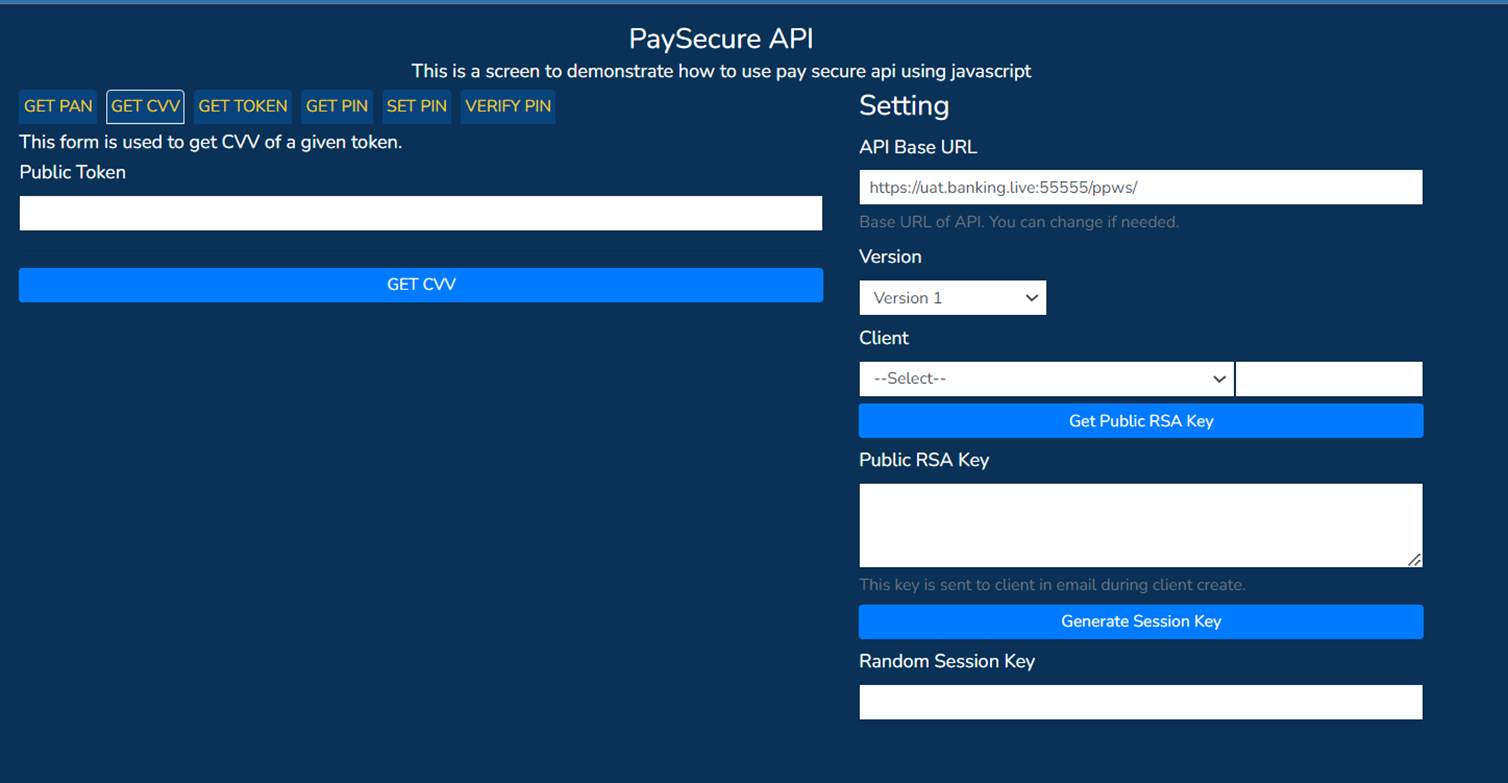
- With the details from step 4 above, you are now able to proceed to the PaySecure API screen.

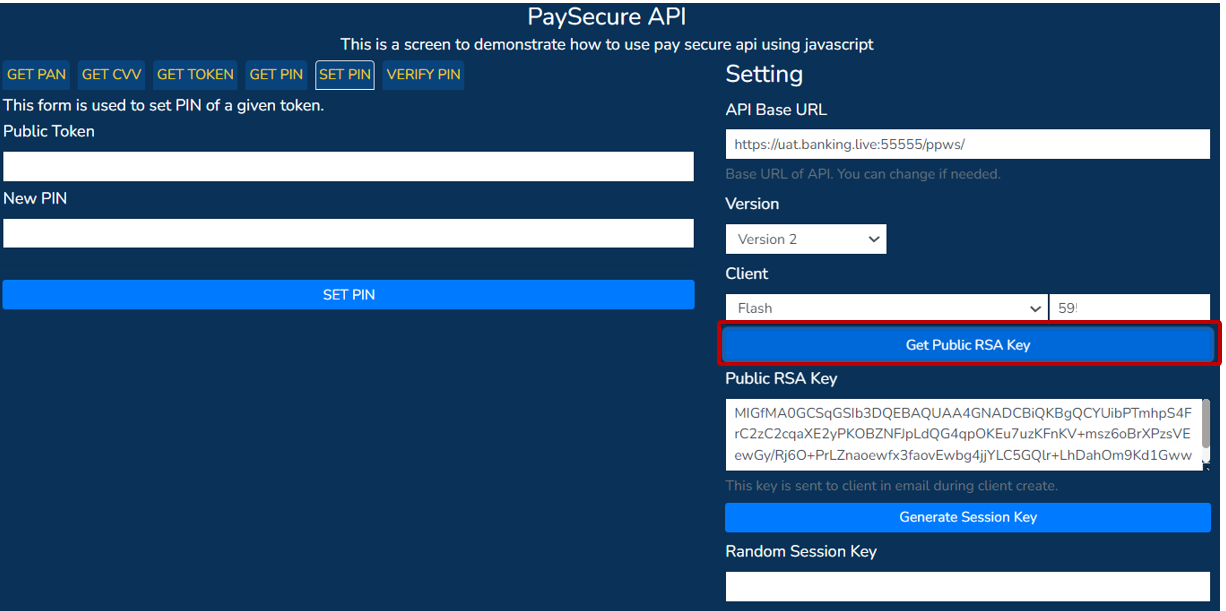
- Now, we need to SET PIN by first selecting Version 2 from the Version drop-down menu.

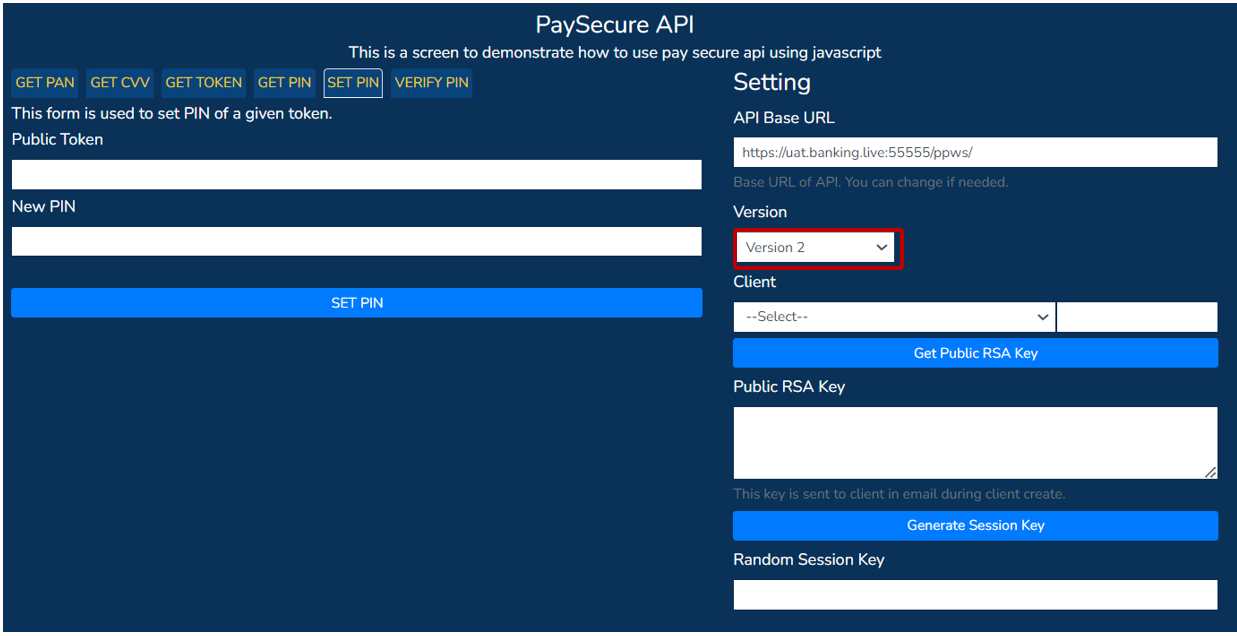
- Then select the applicable Client from the client drop-down menu, followed by Get Public RSA Key. This will then populate the Public RSA Key.
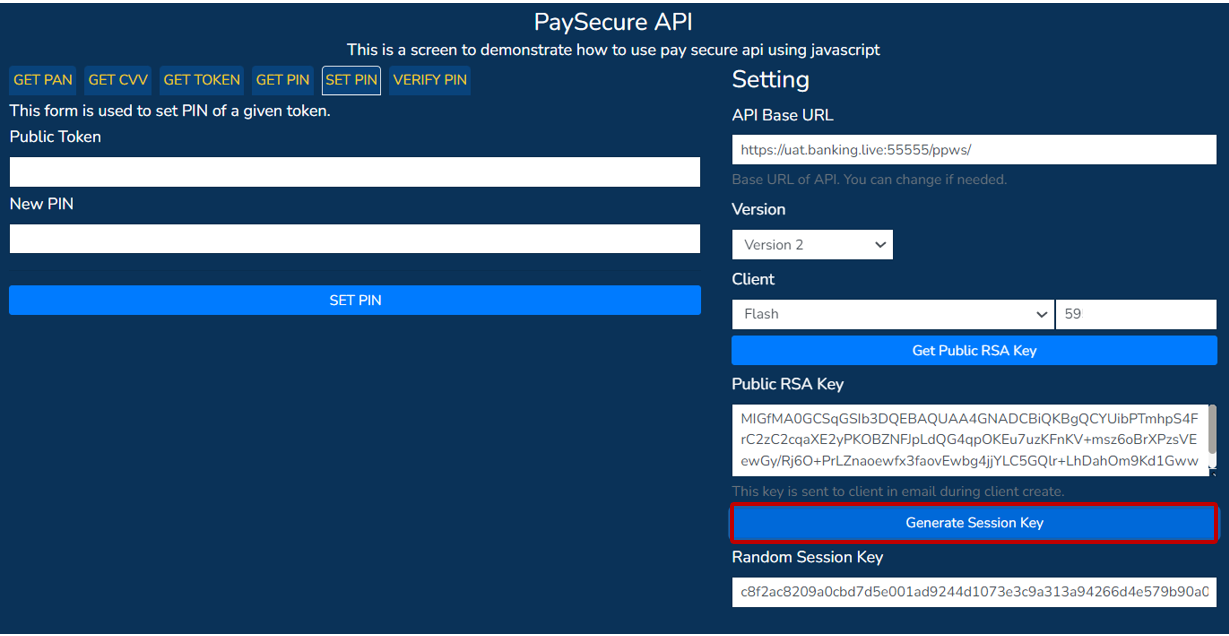
- Proceed to selecting the Generate Session Key button. This will then generate and populate the Random session key.
- Now enter the Public Token and** PIN** you saved in step 4 into the respective fields on the left of the screen.

- Click SET PIN button
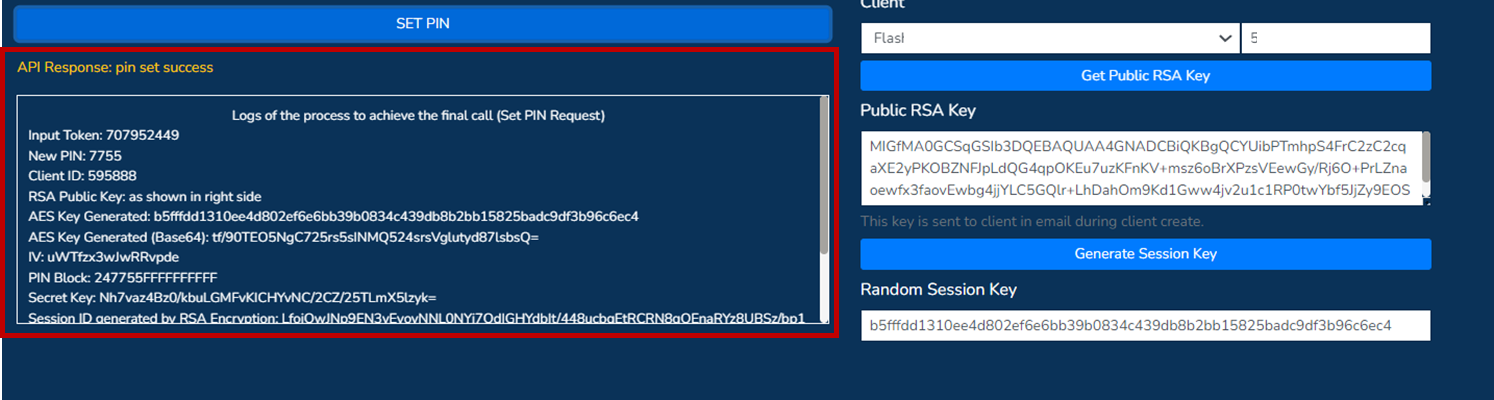
- Upon successful PIN set you are now able to begin performing card tests with the card test simulator.
Carry out card tests
If you have not used your card before, you need to set the PIN before performing card tests.
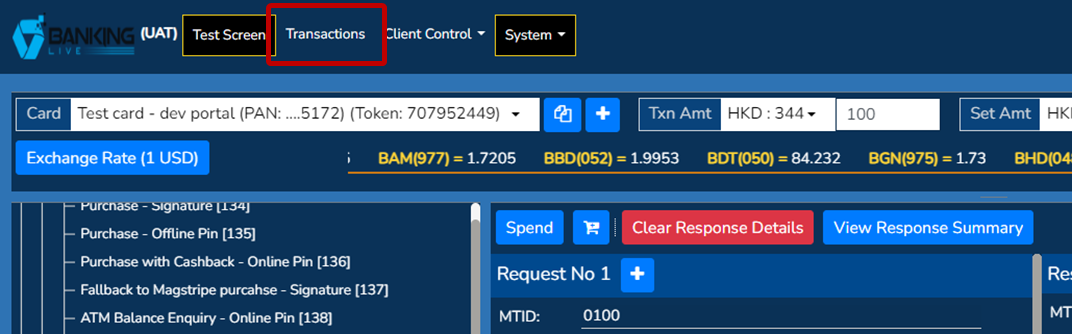
- Card tests are initiated through the Test Screen in PayControl. You can navigate to this screen by following the screenshots below, the navigation to the screen will differ based on your access level setup.
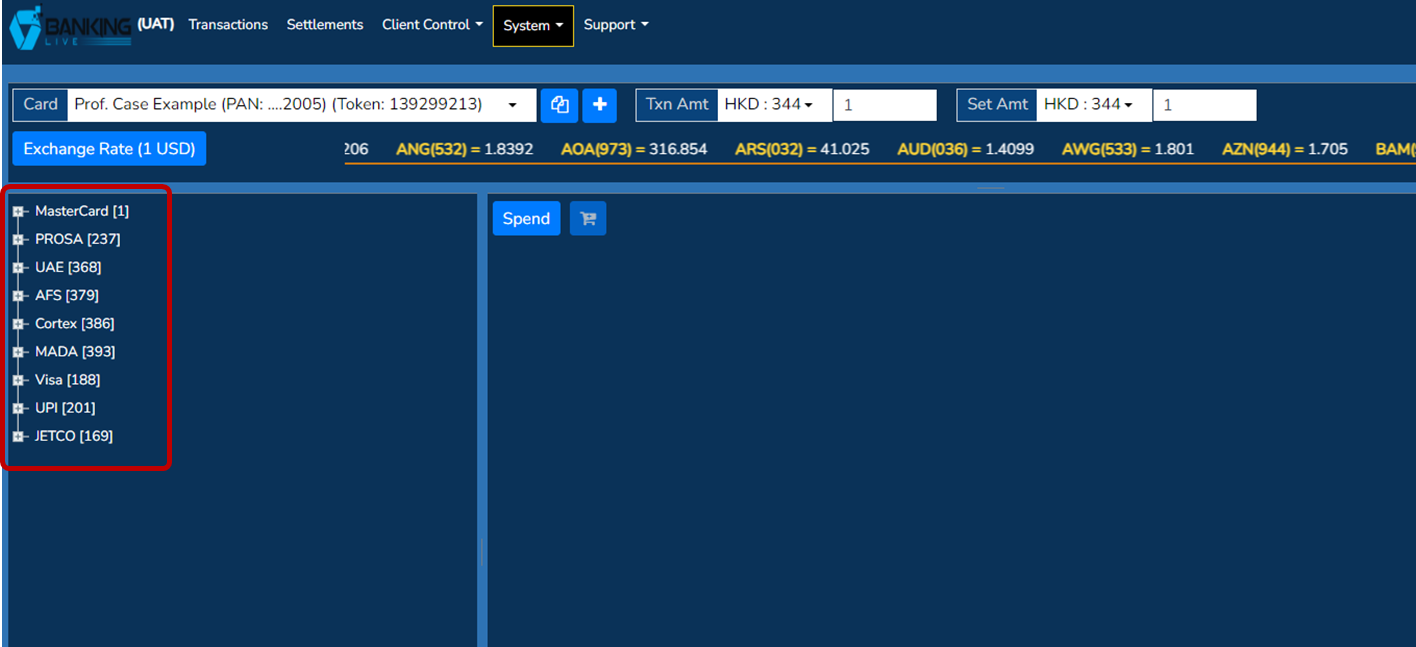
- Once you have navigated to the screen, it will look like the below.
- Test card must be selected from the top left hand corner drop down menu. Example: card called Prof. Case Example is selected.
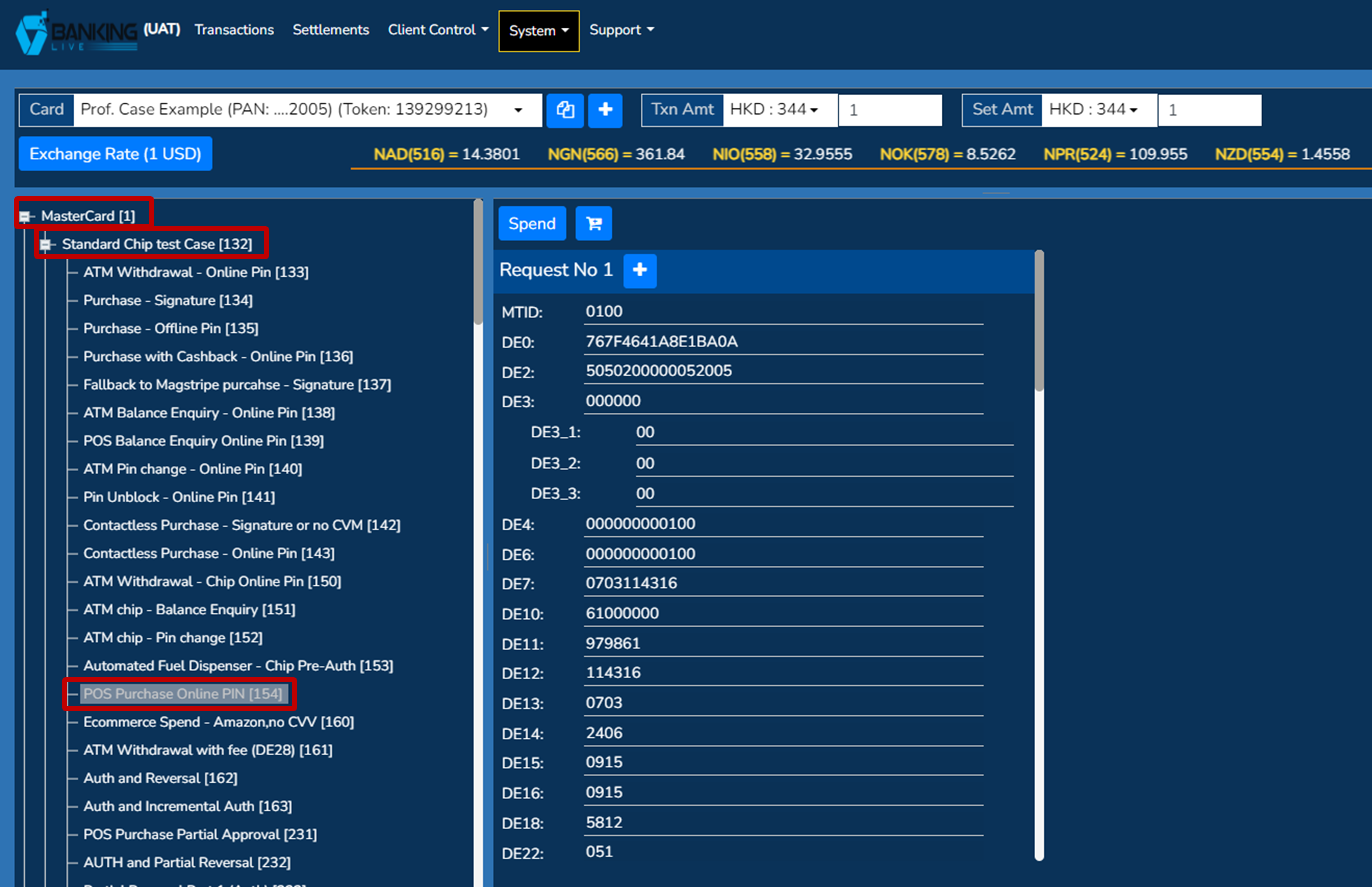
- The desired transaction to test needs to be selected from the left side-menu. The networks and switches expand to form their own transaction message menu. Example: Mastercard - Standard chip test case - POS Purchase online PIN is selected.
- Transaction and settlement amounts and currency can be chosen. The Txn Amt (transaction amount) currency and Set Amt (settlement amount) currency will both default to the billing currency/default currency of the card. Example: Txn Amt** 1HKD** and Set Amt 1HKD is selected and input.
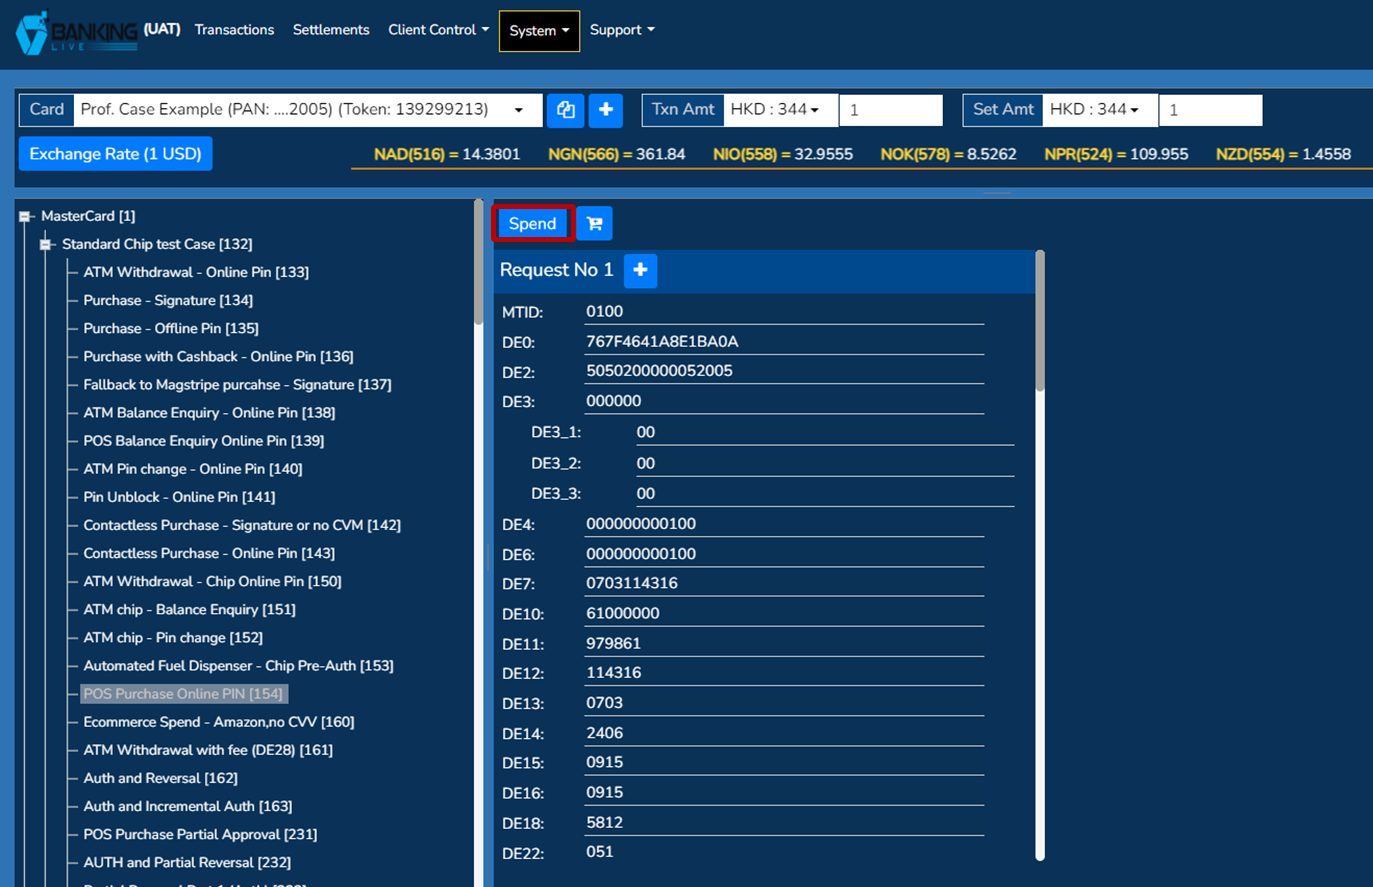
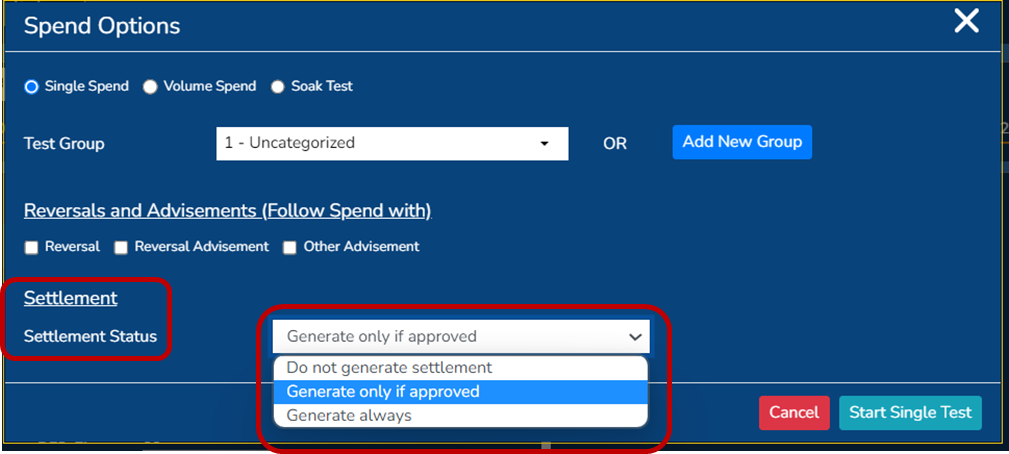
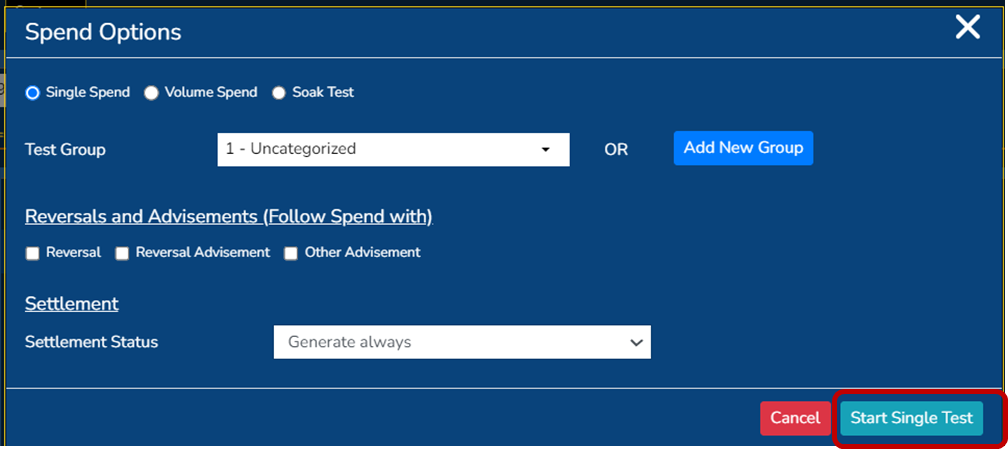
- Spend button is pressed after selecting the required card, transaction and amount. After clicking the spend button, the spend options pop-up will appear. This pop-up allows you to select the the test classification. The three options are single spend, volume spend and soak test.
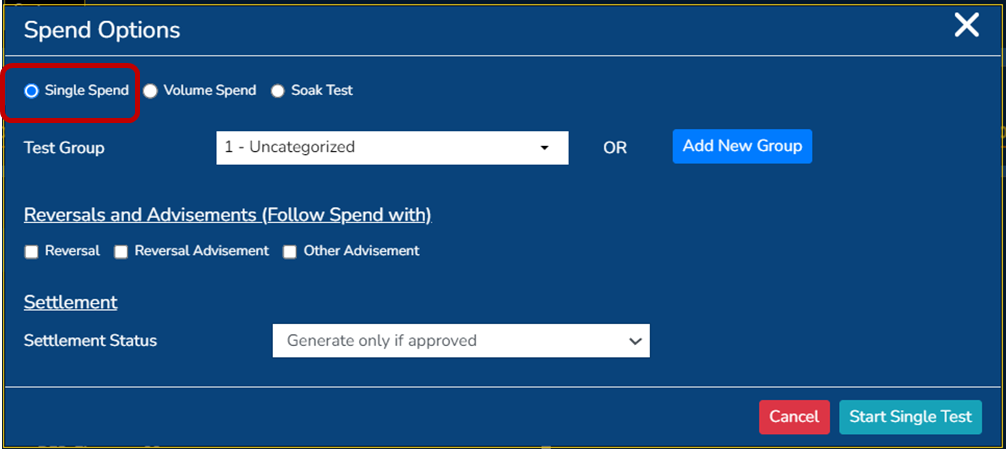
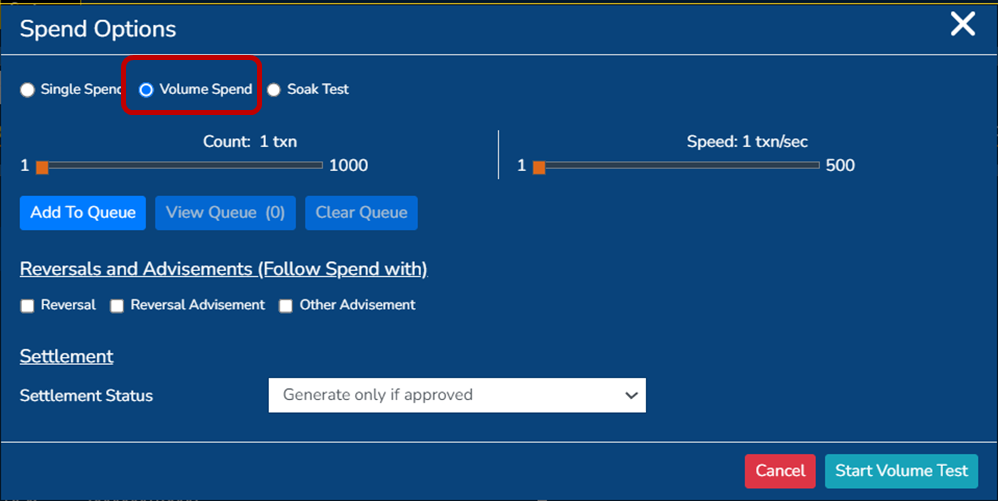
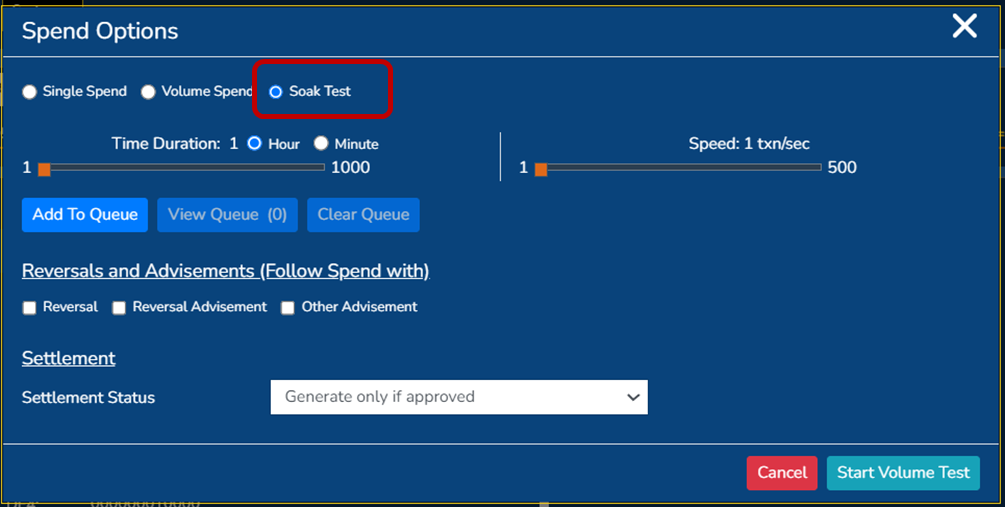
- After selecting a test classification option, users are able to further define their test case by selecting the settlement status. These options include generating settlement only if approved, do not generate settlement and always generate settlement.
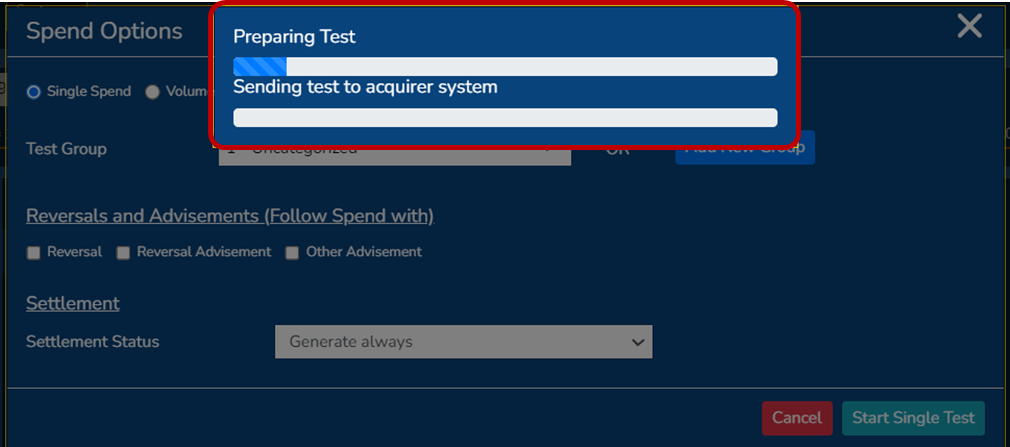
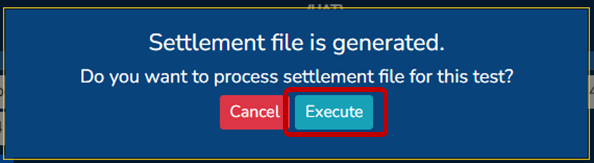
- Start single test button is pressed next. Example: Single spend, generate settlement always. Once Start single test is pressed, the preparing test; sending test to acquirer system screen will populate
- a) Note: If you have selected for the settlement message to be generated, like the example in step 8. You will have the option to cancel this settlement or execute it. Example: Execute selected. Upon successful execution the success message will appear to the right of the screen.
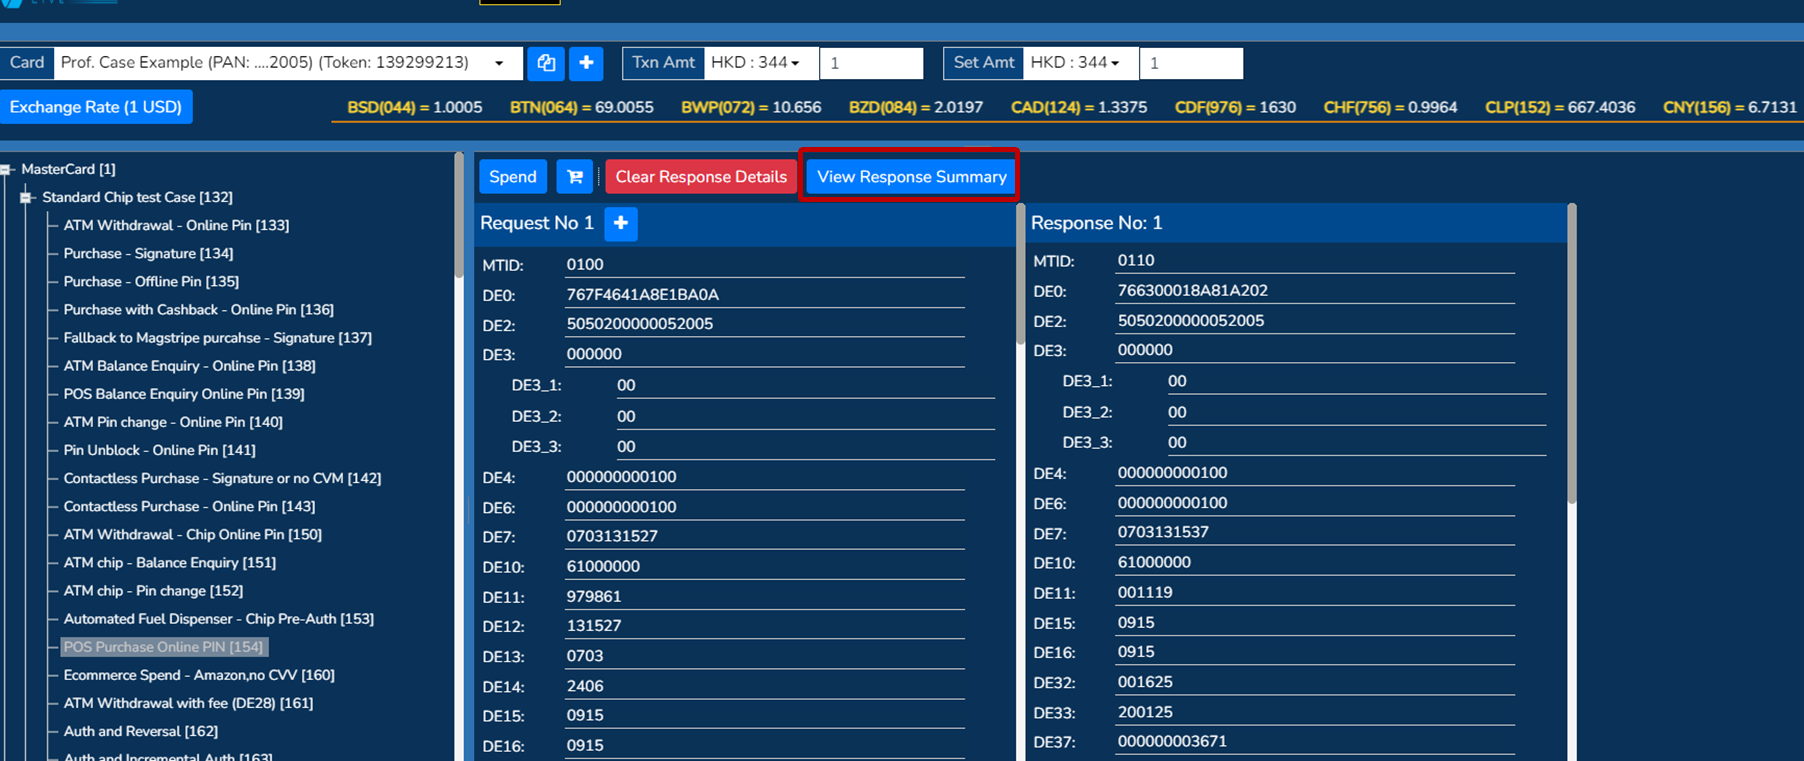
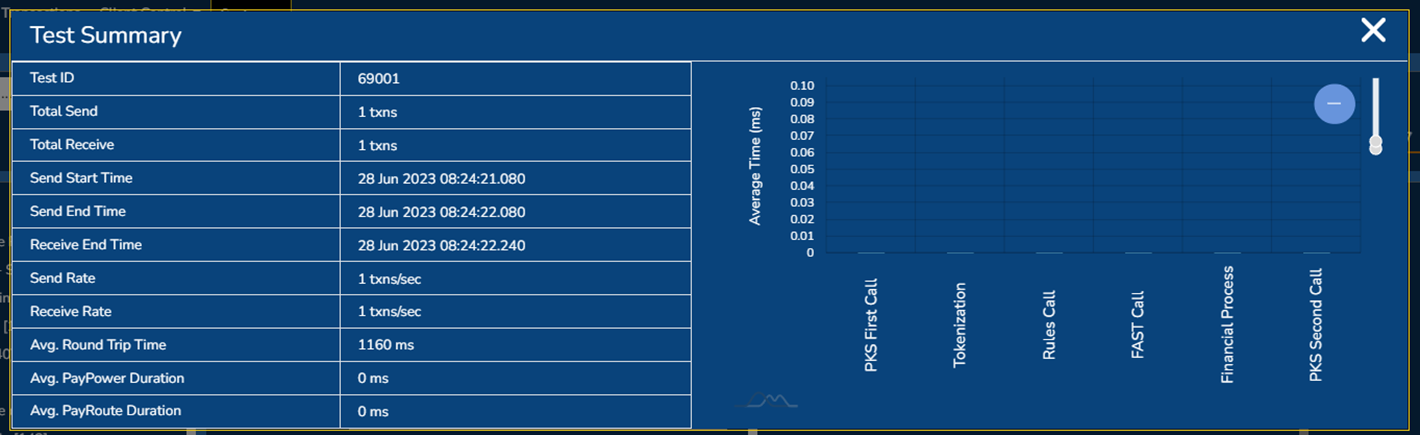
- Final response is then shown on the screen. You are able to drill down further by selecting the View Response Summary to see the timing data of the transaction.
- To view the test history, select Test history on the top right corner of the screen. This shows the previous tests that have been performed on the test card. You are able to specify Date from, Date to, Filter by and Select group parameters also.

Detailed transaction analysis
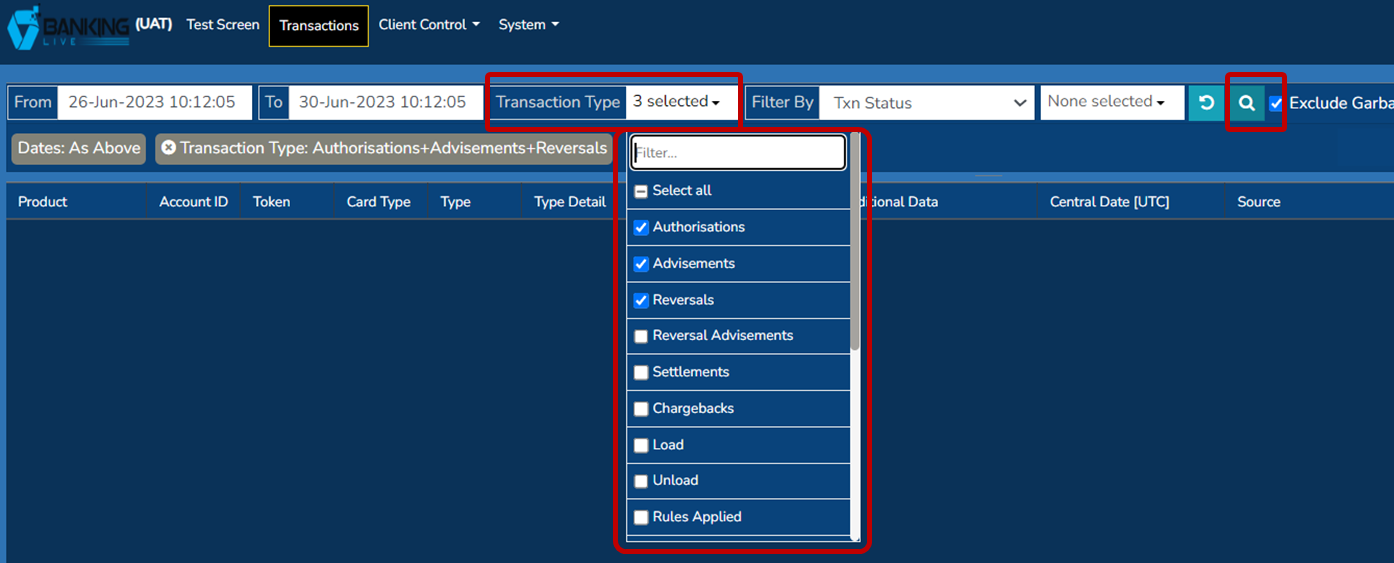
You can drill down further into transactions via the Transactions screen in PayControl.
- Navigate to the screen via URL or page.
- Commence transaction search by selecting the search button.
Transaction type search parameters default to Authorisations, Advisements and Reversals. However, the parameters are able to be specified if you choose. Example: default search
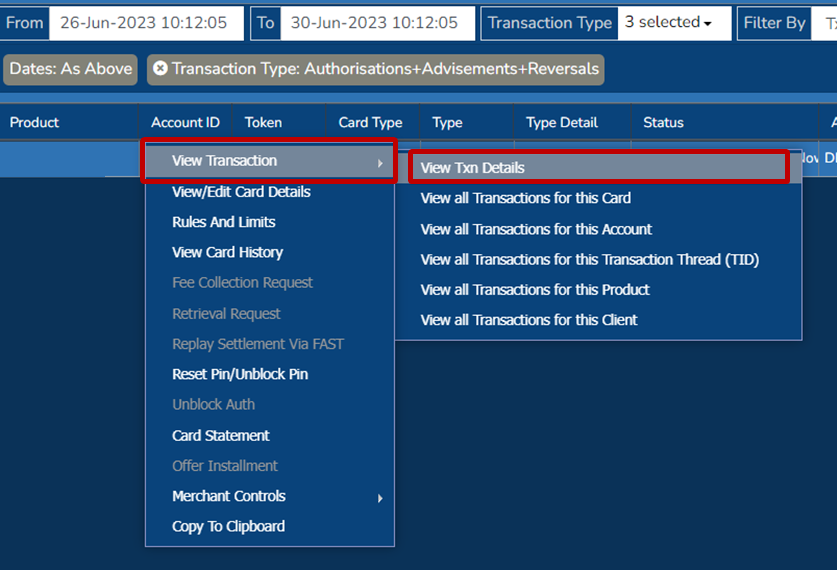
- The transactions performed within the search parameters will populate. Example: Mastercard - Standard chip test case - POS Purchase online PIN, ** Txn Amt 1HKD** and Set Amt 1HKD, Single spend, generate settlement always.

- To drill down further, right click on the transaction and select View txn details
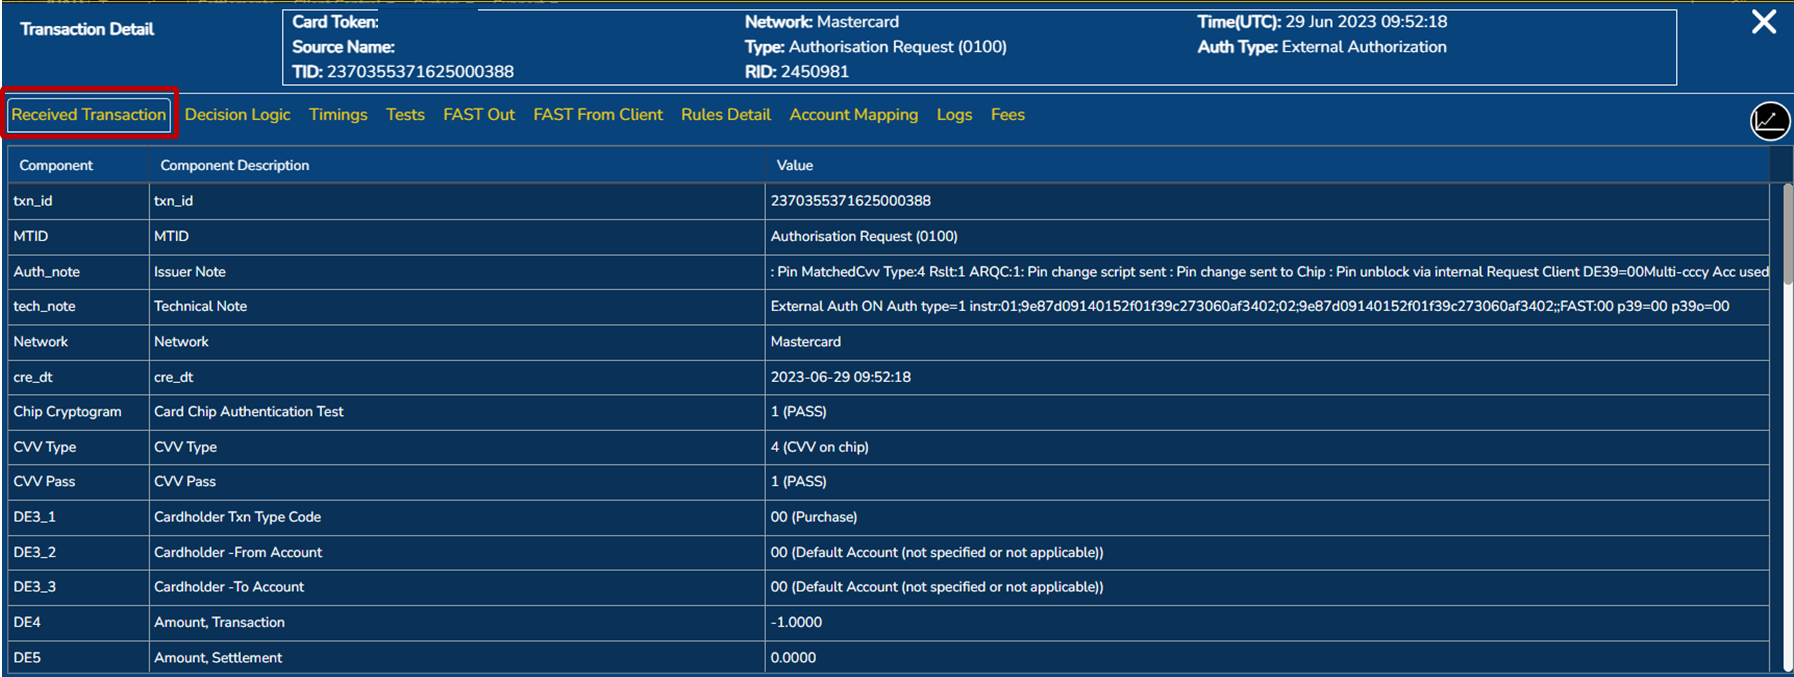
- The comprehensive Transaction Detail screen of the selected transaction will pop-up. Users are then able to review such details as:
- Received transaction
- Decision logic
- Timings
- Tests
- FAST Out
- FAST from client
- Rules detail
- Account mapping
- Logs
- Fees

Further information on these details are provided below.
Received transaction
This provides the detailed data set of the incoming transaction message.
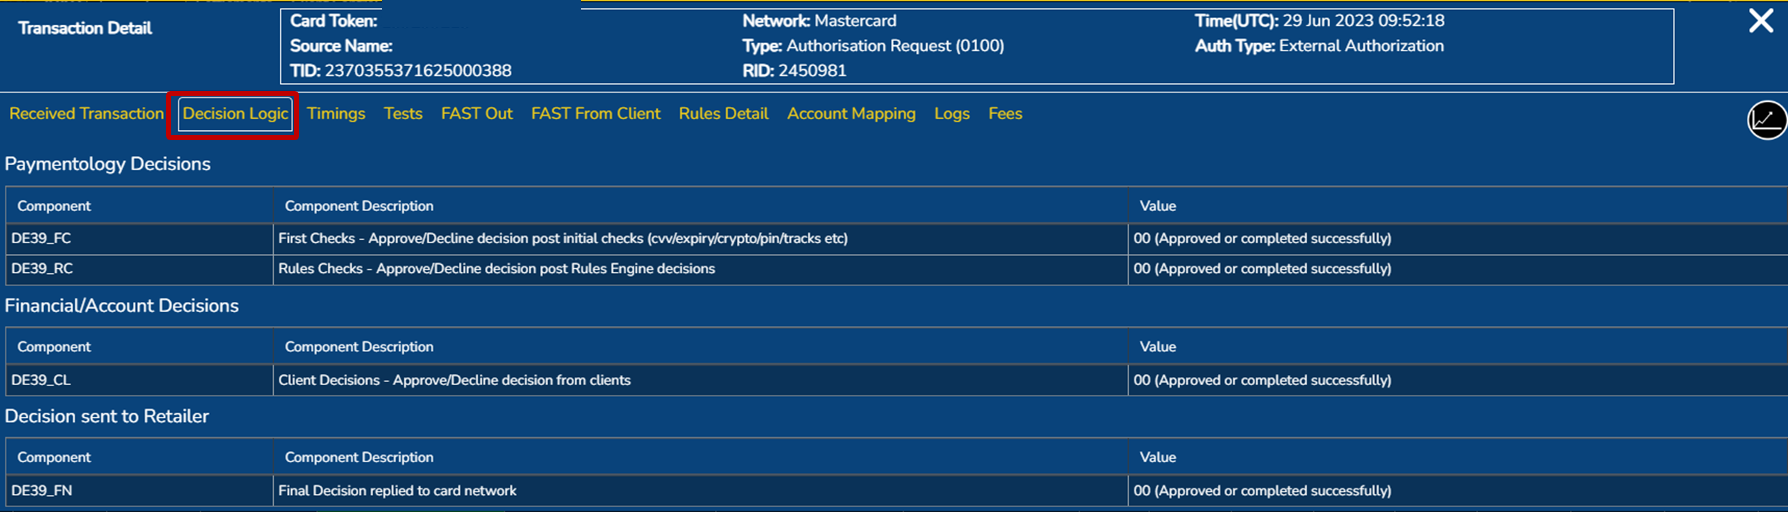
Decision logic
Decision logic is broken down into four components:
- First checks: the initial card validity checks such as PIN, CVV, PAN etc.
- Rules checks: if a rule has been triggered leading to a decline decision
- Financial decision: if the account attached to the card has sufficient funds
- Final decision: the decision or response contained in the response message back to the network or switch.
If a transaction is declined, the decision logic screen is useful as you are able to see at what stage the decision to decline was made.
Timings
Timings breaks down the actual processing of the transaction into multiple stages and shows how long each stage of the process takes. This is useful in the case of a transaction failing due to timeout failure, as you can determine what stage took too long or failed to process.

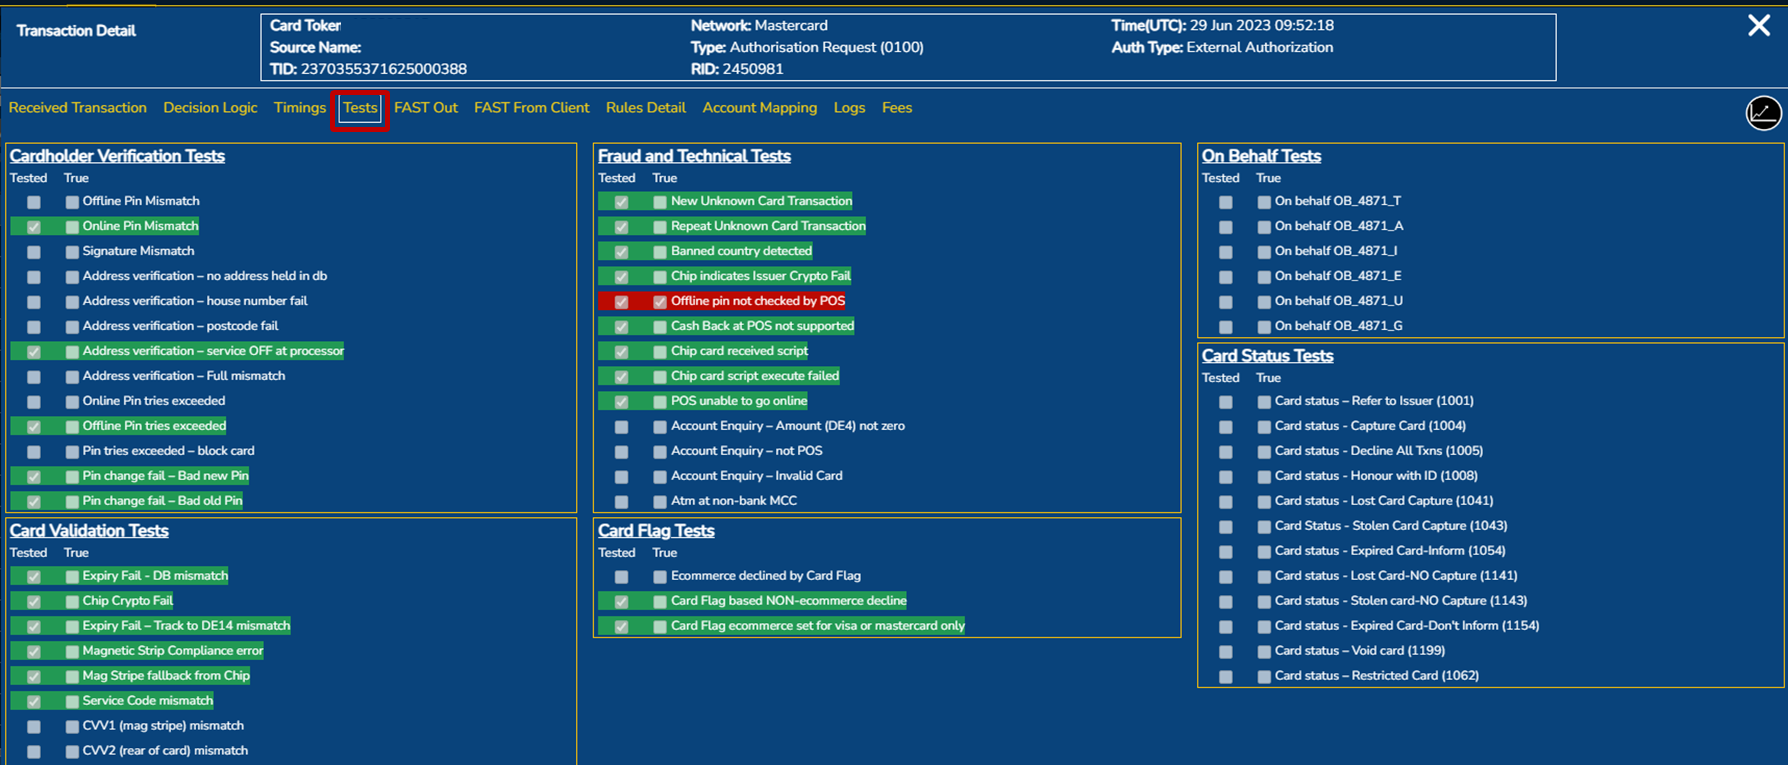
Tests
Multiple tests per transaction are performed to assist with determining validity of the transaction itself. This is part of the enhanced security measures of the platform. Some of these can be utilised in enhanced rulesets and token flags.
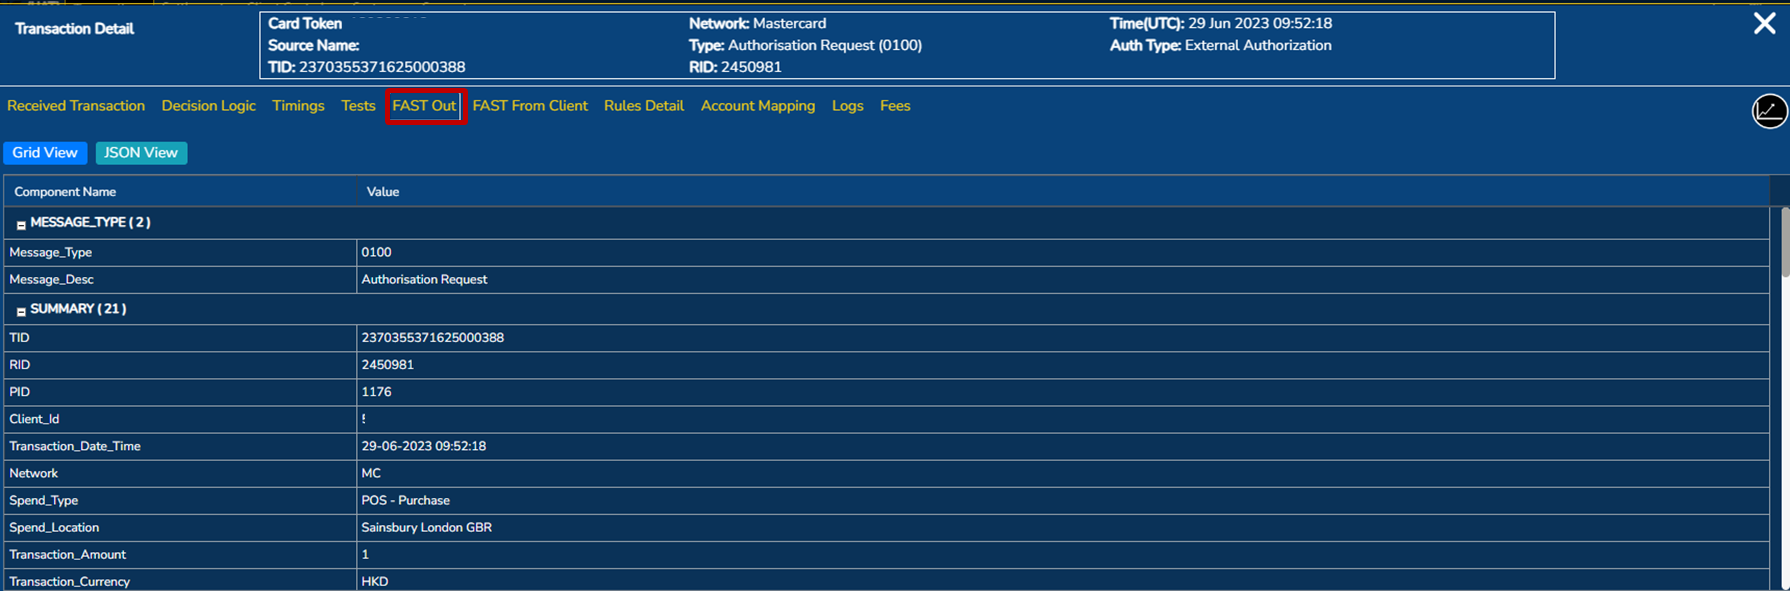
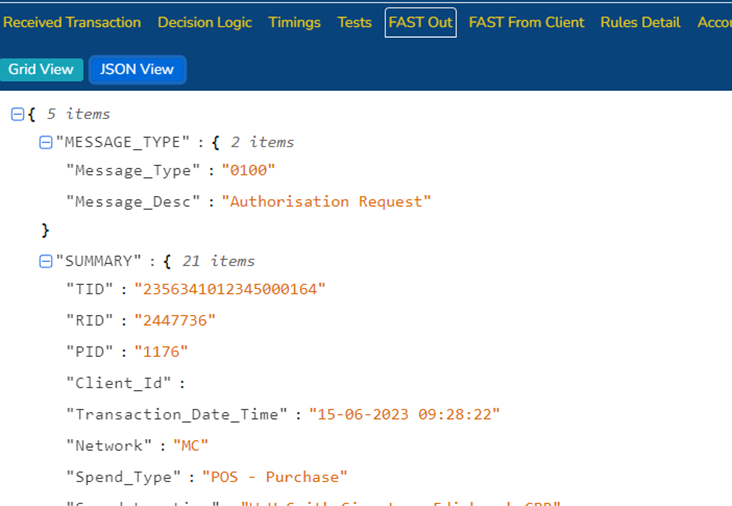
FAST Out
FAST Out is the FAST message sent to the client when the client is performing the financial approve/decline decision. This can be viewed in grid and JSON format.
Users are able to see what data points they are receiving to make the decision.
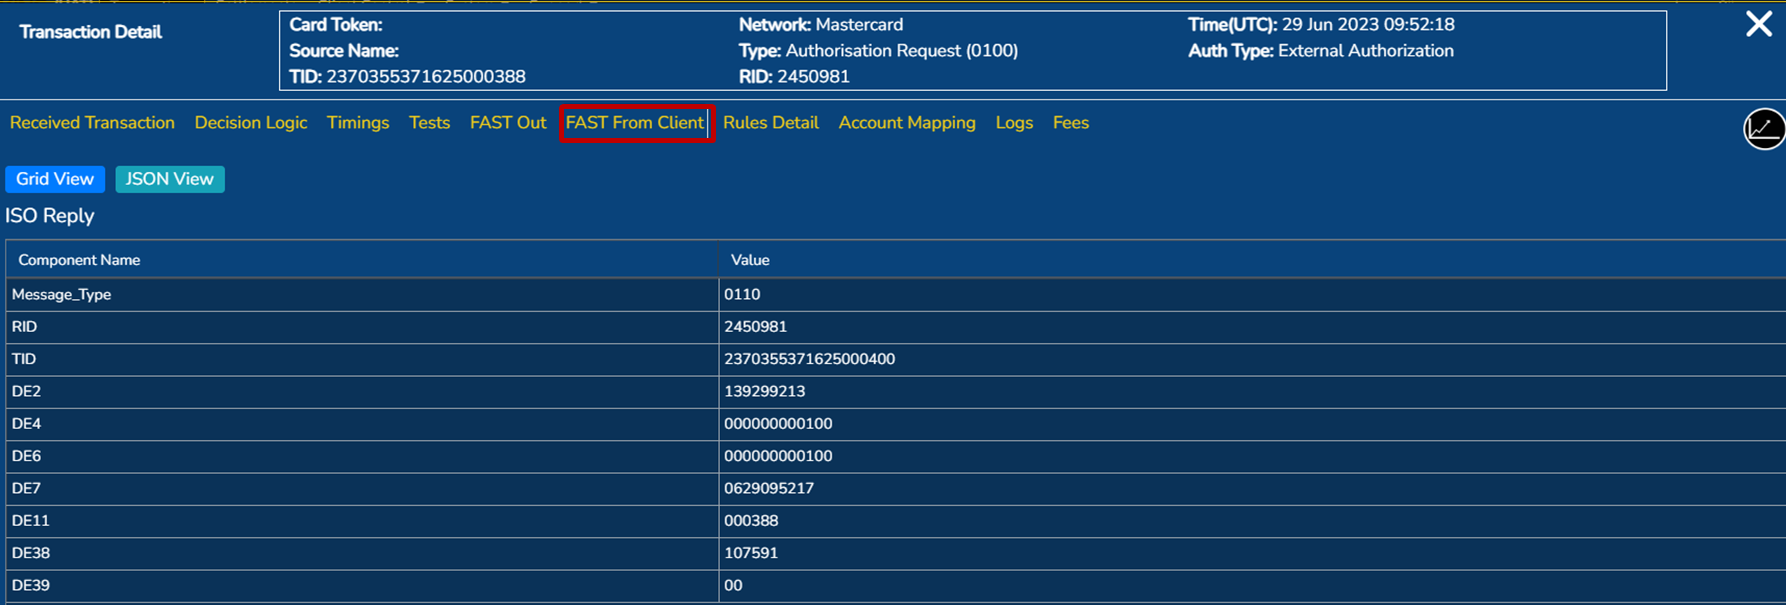
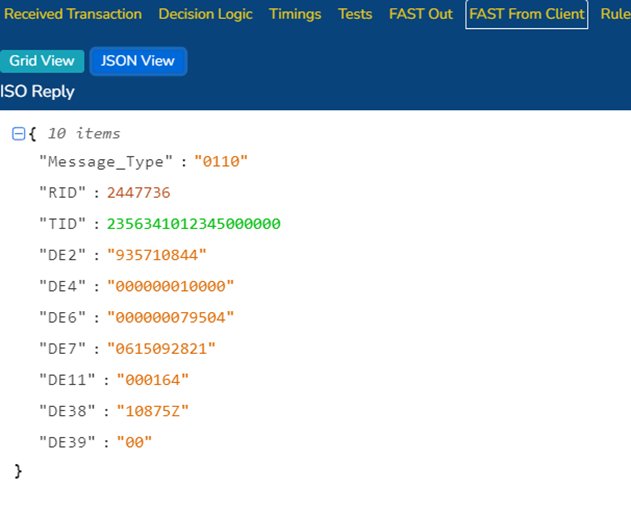
FAST from client
FAST from client is the response the platform receives from the client prior to sending the response message to the network or switch. This is also available to view in grid or JSON format.
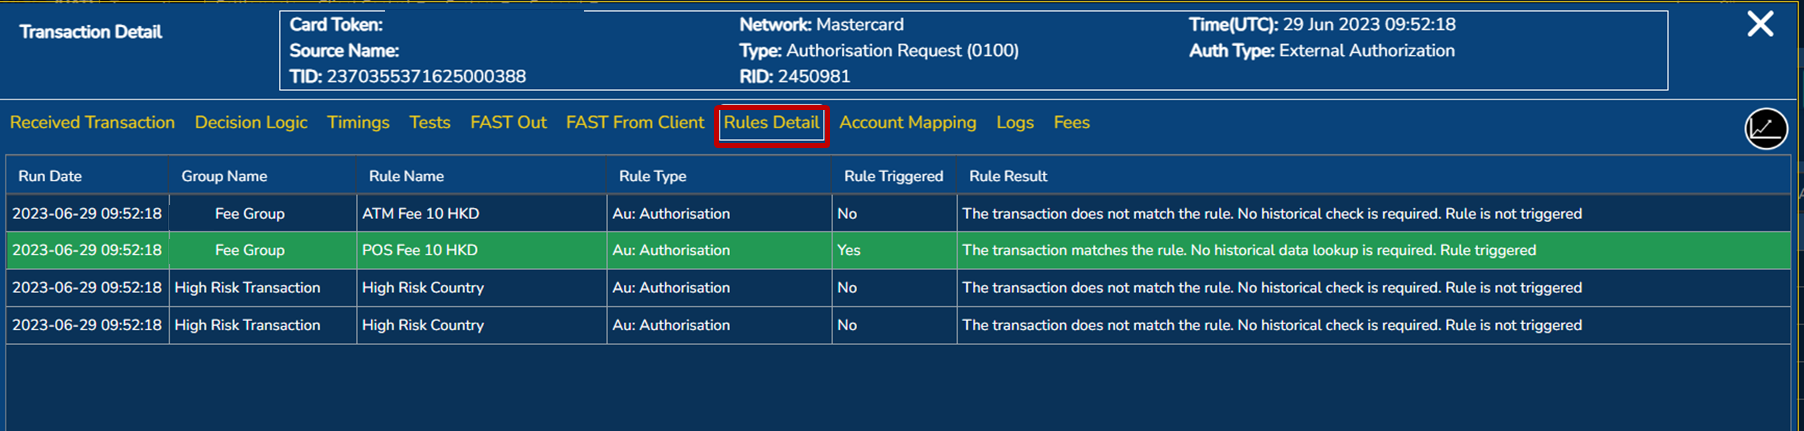
Rules detail
Rules detail shows any rules associated with the card or transaction, regardless of the rule having triggered. This is useful to see if rules are performing if they should and to perform testing on rules prior to implementing it.
Any rule that is triggered will be highlighted.
In this example a fee type rule has been triggered.
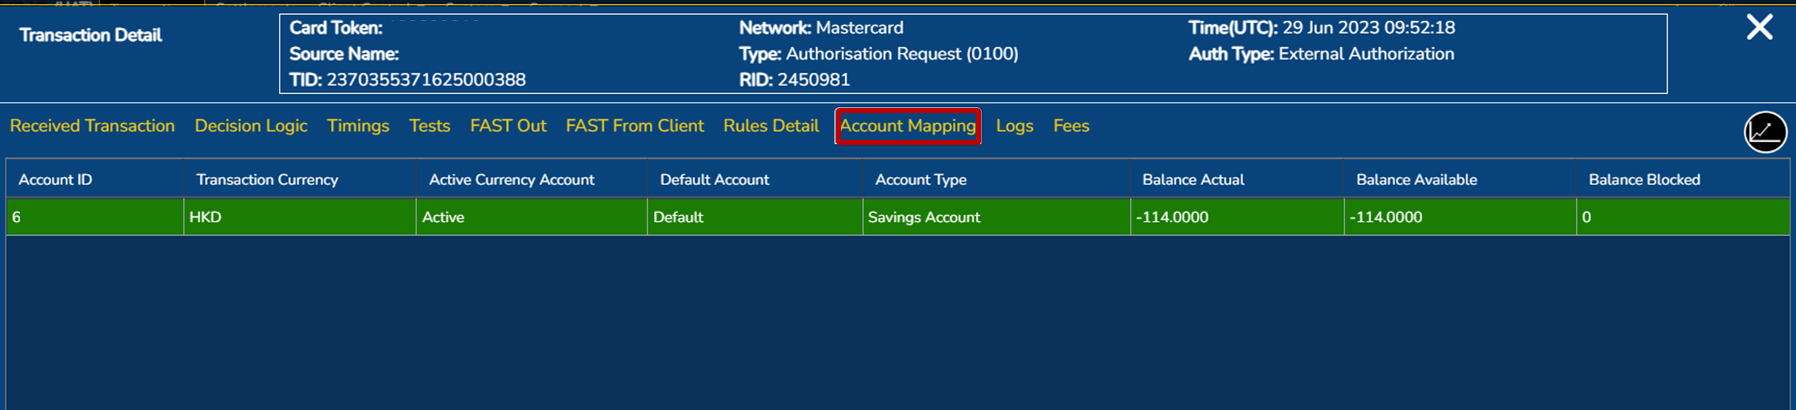
Account mapping
As a card can be attached to multiple currency accounts, or multiple accounts, this is useful to determine which account the transaction has been applied to.
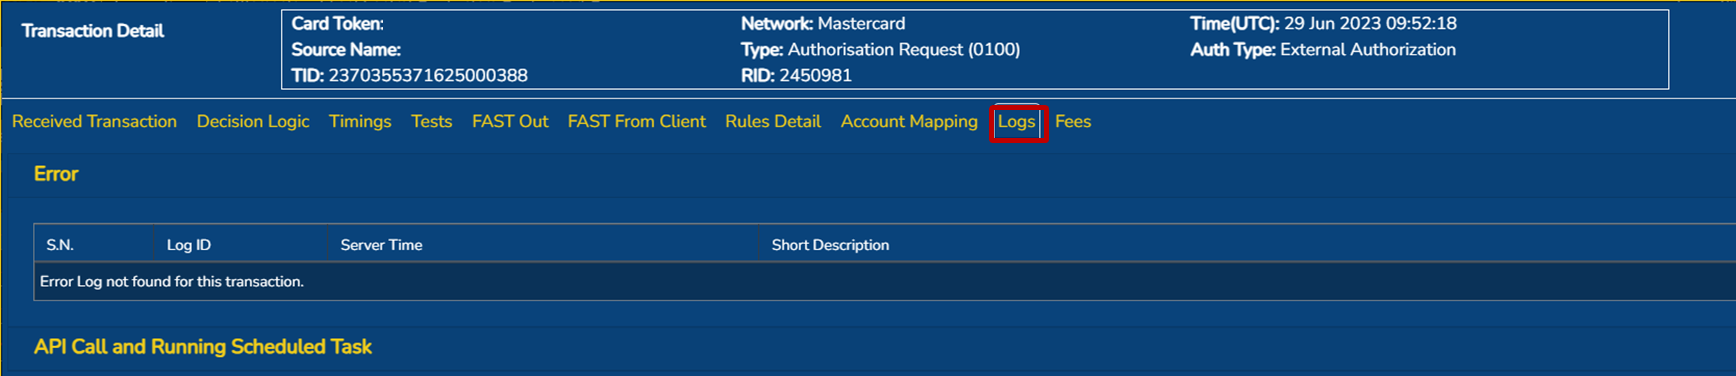
Logs
In the vent an error has occurred through the processing of the transaction, a log entry will be created and viewable on this screen.
Fees
Any fee that has been triggered by a rule being triggered will populate here. The specific amount, currency, date and posted state are all viewable. this is useful when testing how you want a fee to perform.
